
Oh, you have GOT to try these chocolate-covered marshmallow pops at your next party! I first made them for my niece’s birthday, and let me tell you—they disappeared faster than the balloons could deflate. There’s something magical about the way gooey marshmallows and smooth chocolate come together on a stick. Plus, they’re so easy, even my 7-year-old nephew could help (though we did end up with more sprinkles on the floor than the pops—oops!). Whether it’s a kids’ party, a holiday gathering, or just a “hey, it’s Tuesday” treat, these little guys never fail to bring smiles. And the best part? You probably already have most of the ingredients in your pantry right now.
Why You’ll Love These Party Chocolate Covered Marshmallow Pops
Listen, I know you’re going to adore these marshmallow pops just as much as I do—and here’s why:
- Quick & easy: You can whip these up in under 10 minutes (seriously, even while the party guests are ringing the doorbell).
- Party magic: They look way fancier than the effort required—perfect for birthdays, holidays, or “just because” celebrations.
- Endless fun: Go wild with sprinkles, crushed cookies, or even edible glitter (my personal weakness).
- Kid-approved: Little hands love decorating them, and adult hands love sneaking them when no one’s looking.
Trust me, once you make these once, they’ll become your go-to “oh crud, I need a dessert NOW” lifesaver.
Ingredients for Party Chocolate Covered Marshmallow Pops
Okay, confession time—I’ve tried cutting corners with these ingredients before, and let’s just say the results were… tragic. Learn from my mistakes! Here’s exactly what you’ll need:
- 12 large marshmallows: The fresh, pillowy-soft kind—no sad, stale ones allowed! They should bounce back when you squish them.
- 1 cup semi-sweet chocolate chips: Splurge on the good stuff here. That bargain bin chocolate? It’ll leave you with a weird waxy coating. (Ask me how I know.)
- 1 tbsp coconut oil: This little trick makes your chocolate dip like a dream—silky smooth and perfect for coating.
- 12 lollipop sticks: The 6-inch ones work best—long enough to hold without getting messy fingers.
- Sprinkles/crushed nuts/whatever makes you happy: This is where the magic happens! I’ve used everything from crushed pretzels to freeze-dried strawberries.
Pro tip: Double the batch. Trust me, you’ll regret it if you don’t—these disappear faster than you can say “chocolate coma.”
Equipment You’ll Need
Don’t worry—you won’t need any fancy gadgets for these marshmallow pops! Just grab:
- A microwave-safe bowl: Glass works best (and lets you spy on that chocolate while it melts—no burning allowed!).
- Parchment paper: Lifesaver for easy cleanup and preventing sticky disasters.
- Baking sheet: Any flat surface will do, but I like lining mine with that trusty parchment paper for extra insurance.
That’s it! No stand mixers, no thermometers—just simple tools you probably already have clattering around in your kitchen drawers.
How to Make Party Chocolate Covered Marshmallow Pops
Okay, let’s get to the fun part—making these irresistible pops! Don’t let the fancy look fool you; it’s seriously simple. Just follow these steps, and you’ll have a plate full of happiness in no time.
Step 1: Prepare the Marshmallows
First things first—grab those marshmallows and lollipop sticks. Gently push a stick into the flat side of each marshmallow, going about halfway through. Don’t be shy—you want it secure enough that it won’t slide off when you dip it. (Learned that lesson the hard way when a rogue marshmallow took a chocolate bath without its stick!) If they feel wobbly, twist the stick slightly as you push it in—that usually does the trick.
Step 2: Melt the Chocolate
Now, the chocolate! Dump those chips and coconut oil into your microwave-safe bowl. Microwave in 30-second bursts, stirring well after each one. The coconut oil is your secret weapon here—it keeps the chocolate smooth and dippable. Stop when it’s just melted (about 1-1.5 minutes total). No cheating—if you overheat it, the chocolate will seize up, and we’ll have a sad, lumpy situation. If that happens? Add a tiny bit more coconut oil and stir like crazy to rescue it.
Step 3: Dip and Decorate
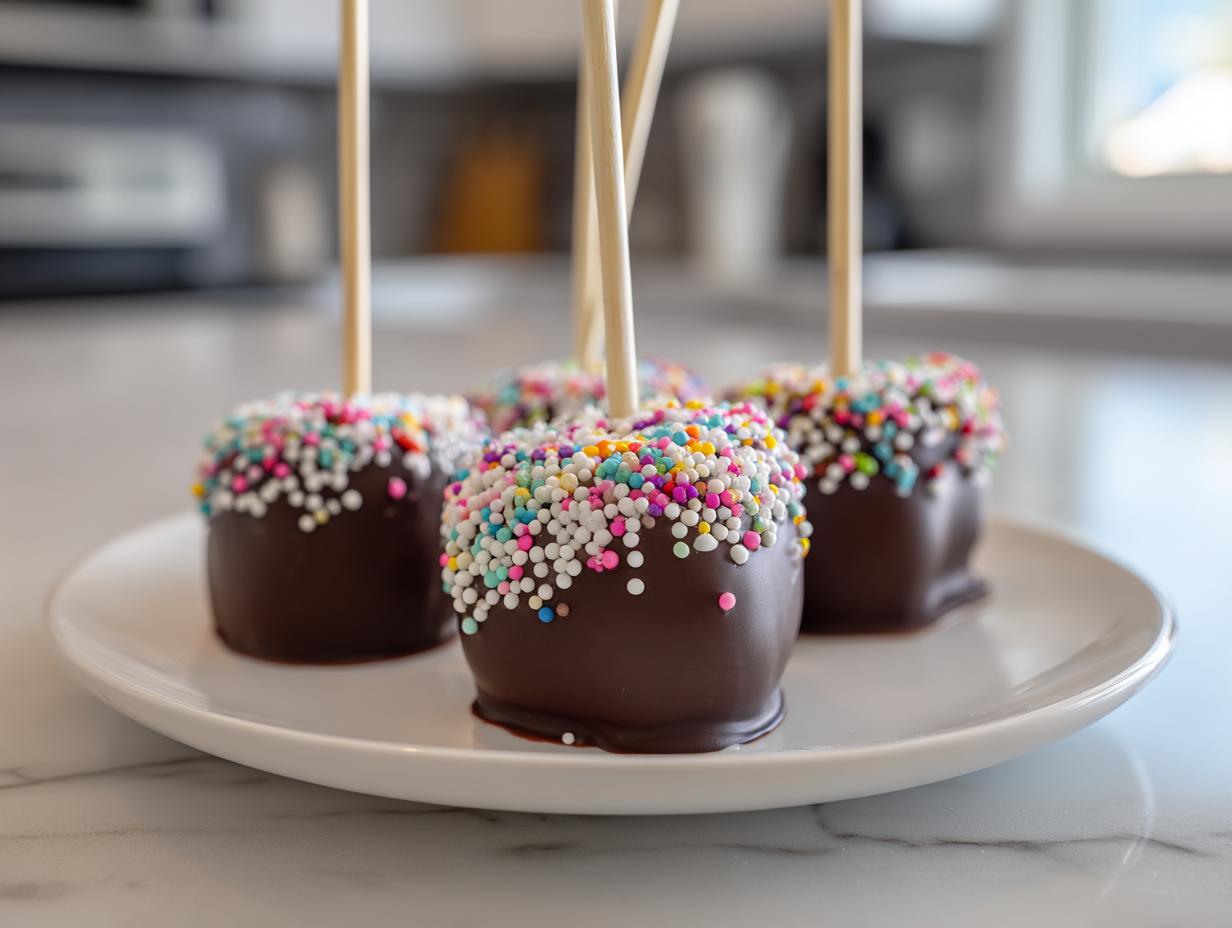
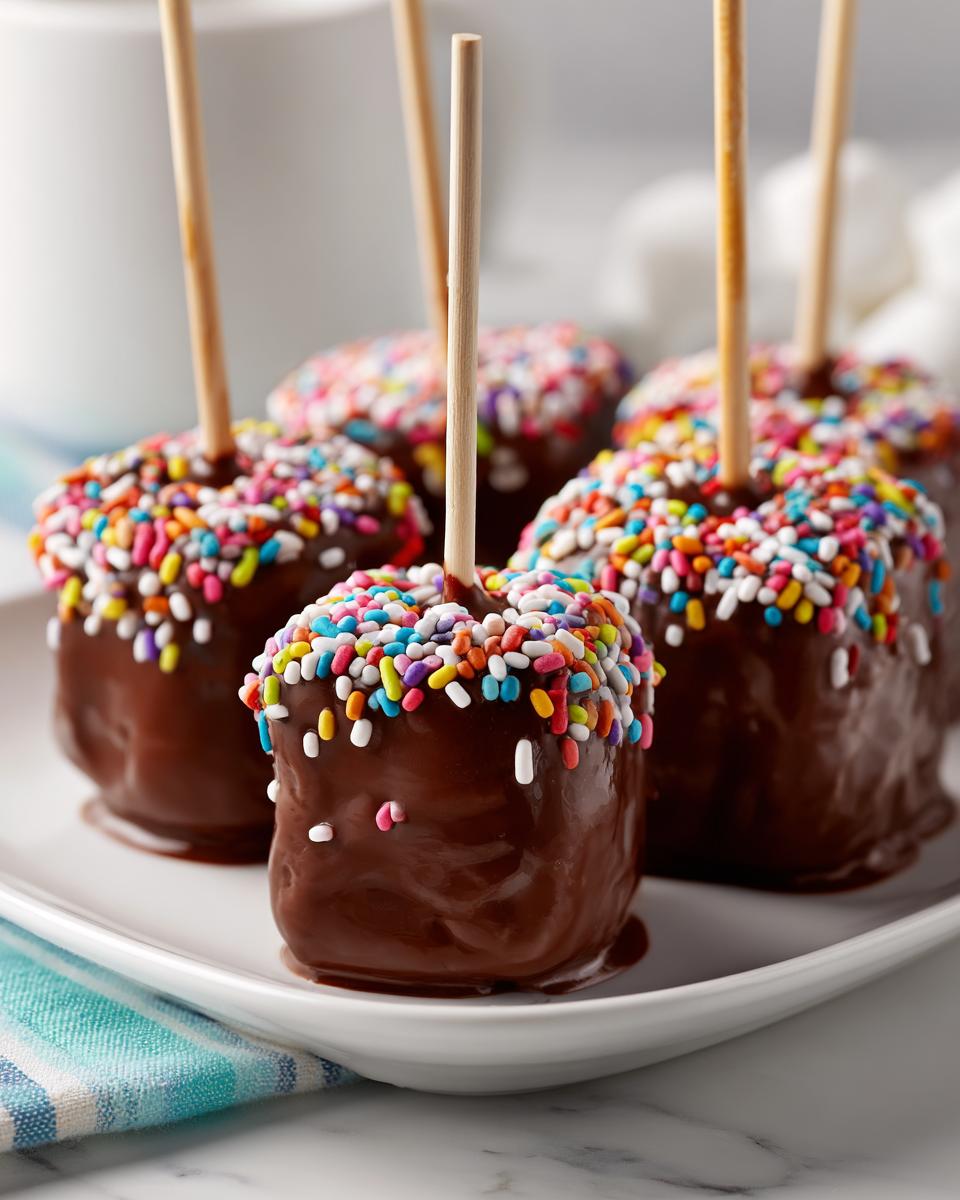
Here’s where the magic happens! Hold a marshmallow by the stick and dunk it into the chocolate, swirling to coat completely. Let the excess drip off for a second (I usually give it a gentle tap against the bowl’s edge). Then—act fast—sprinkle on your toppings while the chocolate’s still wet. Pro tip: Hold the pop over a plate to catch runaway sprinkles. (My floor has seen enough rainbow glitter for a lifetime.)
Step 4: Let Them Set
Place each finished pop onto your parchment-lined tray. Now, the hardest part: walk away. Let them set at room temperature for about 30 minutes. No peeking! If you’re impatient like me, you can pop them in the fridge for 10 minutes—but room temp gives the shiniest finish. Once they’re firm, they’re ready to party!
Tips for Perfect Party Chocolate Covered Marshmallow Pops
After making approximately a zillion of these pops (okay, maybe just dozens), I’ve picked up some tricks that’ll save you from the pitfalls I stumbled into:
- Fresh marshmallows are non-negotiable: That bag that’s been sitting in your pantry since last Halloween? Toss it. Fresh ones give that perfect squishy center.
- Chocolate acting stubborn? Just zap it for 5 more seconds—it’ll loosen right up. I keep my microwave running like a chocolate ER during big batches.
- Move like lightning: Once that chocolate’s melted, it’s go time. I line up all my toppings in little bowls beforehand—military precision for maximum decorating speed.
- Topping playground: My favorite accidental discovery? Crushed potato chips for salty-sweet perfection. Don’t be afraid to get weird with it!
Remember: Even the “mess-ups” still taste amazing. My first batch looked like abstract art but disappeared just as fast!
Variations for Party Chocolate Covered Marshmallow Pops
Oh, the possibilities! Once you’ve mastered the basic version, it’s time to play. Here are my favorite ways to mix things up:
- Chocolate switcheroo: Swap semi-sweet for white chocolate (my niece’s favorite) or go dark for a richer bite. Just adjust the coconut oil—white chocolate needs a smidge more to stay smooth.
- Rainbow revolution: Stir in a few drops of food coloring to melted white chocolate for pastel pops. Pro tip: Gel colors work best—no watery disasters!
- Drizzle drama: After the first coat sets, zigzag melted caramel or peanut butter over the top. It looks fancy and adds that sweet-salty punch I can’t resist.
The best part? No two batches ever have to be alike. Last week I did a “mystery flavor” batch where every pop had different toppings—total party hit!
Serving and Storing Party Chocolate Covered Marshmallow Pops
Here’s the beautiful thing about these pops—they’re ready to party the second the chocolate sets! I love sticking them upright in a tall glass or foam block for a fun display. But if (somehow) you have leftovers, just pop them in an airtight container at room temperature. They’ll stay fresh for about 3 days—though in my house, they rarely last past day one! Avoid the fridge unless your kitchen’s super warm—it can make the marshmallows sweat and the chocolate lose its shine. Pro tip: Layer them between parchment paper so they don’t stick together. Not that you’ll need this advice… these babies tend to vanish!
Party Chocolate Covered Marshmallow Pops FAQs
Got questions? I’ve got answers! Here are the things people ask me most about these irresistible pops:
Can I use mini marshmallows?
You totally can—but hear me out first! Mini marshmallows mean you’ll need shorter sticks (try coffee stirrers or even toothpicks). The real challenge? Dipping them without making a chocolate-covered mess. I find using a fork to gently roll them works better than trying to dunk. Just know you’ll end up with bite-sized treats instead of the classic pop experience. Perfect for kids’ little hands though!
How do I prevent cracking?
Oh man, I’ve had my share of cracked chocolate disasters! The secret? First, make sure your chocolate isn’t too thick—that coconut oil keeps it fluid. Second, let them cool at room temp instead of rushing to the fridge. And third (this one’s sneaky), don’t move them until fully set! That impatient wiggle-check is often the culprit behind those hairline fractures.
Can I make these ahead?
Absolutely! I often make them the night before a party. Just store them in a single layer in an airtight container at room temperature. They’ll stay perfect for 2-3 days—though the marshmallows might start losing some fluffiness after day two. Pro tip: Wait to add delicate toppings like sprinkles until right before serving if you’re prepping early—they can bleed color over time.
Still stumped? Shoot me a message—I’ve probably made every mistake possible with these pops and lived to tell the tale!
Nutritional Information
Just so you know—these numbers are ballpark estimates based on my typical ingredients. Your exact counts might dance around a bit depending on your chocolate brand or how generous you get with those sprinkles! (We don’t judge here.) Each pop comes in around 120 calories, with that perfect balance of sweet and slightly less sweet. Remember—these are treats, not health food, so enjoy them with that joyful abandon only party desserts deserve!
Now go make some magic—and tag me when you do! I live for seeing your creative topping combos and kitchen victories.
Print
Irresistible Party Chocolate Covered Marshmallow Pops in 10 Minutes
- Total Time: 45 minutes
- Yield: 12 pops 1x
- Diet: Vegetarian
Description
Make these fun and easy chocolate-covered marshmallow pops for your next party. They are a sweet treat that everyone will love.
Ingredients
- 12 large marshmallows
- 1 cup semi-sweet chocolate chips
- 1 tbsp coconut oil
- 12 lollipop sticks
- Sprinkles or toppings of your choice
Instructions
- Insert a lollipop stick into each marshmallow.
- Melt chocolate chips and coconut oil in a microwave-safe bowl, stirring every 30 seconds until smooth.
- Dip each marshmallow into the melted chocolate, coating it completely.
- Hold the marshmallow over the bowl to let excess chocolate drip off.
- Decorate with sprinkles or toppings while the chocolate is still wet.
- Place the pops on parchment paper and let them set for 30 minutes.
Notes
- Use high-quality chocolate for the best results.
- If the chocolate thickens, reheat it for a few seconds.
- Store in an airtight container for up to 3 days.
- Prep Time: 10 minutes
- Cook Time: 5 minutes
- Category: Dessert
- Method: No-Bake
- Cuisine: American
Nutrition
- Serving Size: 1 pop
- Calories: 120
- Sugar: 15g
- Sodium: 10mg
- Fat: 6g
- Saturated Fat: 3.5g
- Unsaturated Fat: 2g
- Trans Fat: 0g
- Carbohydrates: 18g
- Fiber: 1g
- Protein: 1g
- Cholesterol: 0mg


