
Oh my goodness, do I have a treat for you! These Nostalgic Chocolate Fudge Stuffed Marshmallow Pops take me straight back to childhood summers at my grandma’s house. She’d always have a stash of fudge squares in her candy dish, and we’d roast marshmallows over her gas stove (don’t tell mom!). This recipe combines those two magical flavors into one irresistible bite-sized pop. The best part? They’re ridiculously easy to make – just 15 minutes from start to sticky-fingered finish. Trust me, these will disappear faster than you can say “seconds please!”
Why You’ll Love These Nostalgic Chocolate Fudge Stuffed Marshmallow Pops
Oh, where do I even start? These little bites of joy are basically happiness on a stick! Here’s why they’re about to become your new go-to treat:
- Easiest dessert ever – No oven, no fuss, just 15 minutes of pure fun
- Kid magic – My niece calls them “unicorn lollipops” and begs to help decorate
- Party superstar – They disappear faster than balloons at a birthday bash
- Endless creativity – Go wild with sprinkles, crushed cookies, or even edible glitter (my personal weakness)
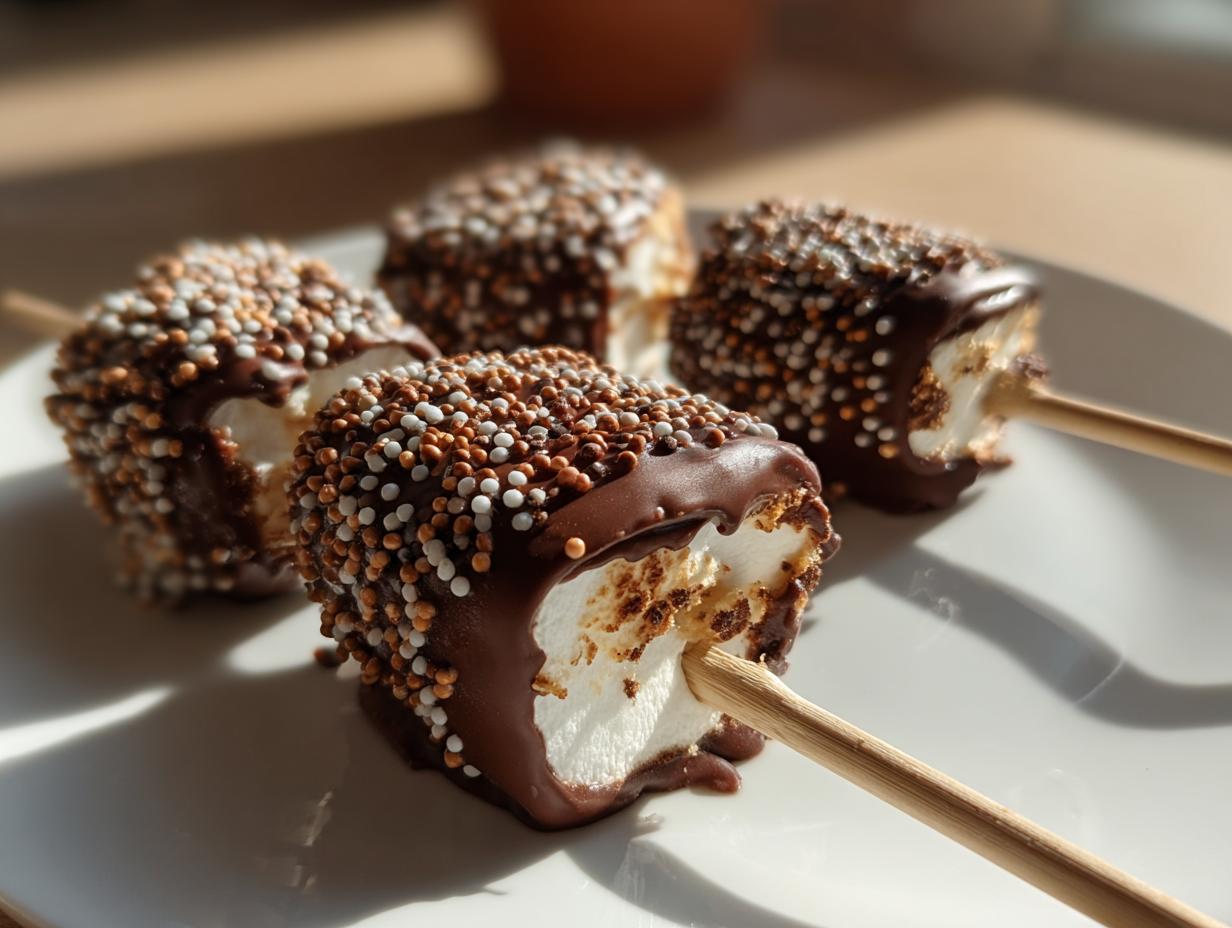
- That perfect texture – Creamy fudge meets pillowy marshmallow under a crisp chocolate shell
Seriously, these pops taste like childhood summers and happy memories all rolled into one sticky, delicious package.
Ingredients for Nostalgic Chocolate Fudge Stuffed Marshmallow Pops
Okay, let’s gather our goodies! Here’s everything you’ll need to make these magical pops – trust me, you probably have most of this in your pantry already:
- 1 cup chocolate fudge – Now, here’s my little secret: I sometimes use my grandma’s homemade fudge recipe (it’s the best!), but store-bought works perfectly fine too. Just make sure it’s nice and soft.
- 12 large marshmallows – The big, puffy ones! None of those tiny guys – we want that perfect marshmallow-to-fudge ratio.
- 6 wooden popsicle sticks – You can find these at any craft store. I keep a stash in my baking drawer just for these pops!
- 1/2 cup chocolate chips – For that gorgeous outer shell. I prefer semi-sweet, but milk chocolate works great too if you’ve got a sweet tooth like me.
- 1 tbsp coconut oil (optional) – This makes the chocolate melt smoother and gives it that perfect dipping consistency. But don’t worry if you don’t have any – they’ll still turn out delicious!
- Sprinkles or toppings (optional) – This is where the fun begins! I love using rainbow sprinkles, crushed graham crackers, or even mini chocolate chips for extra texture.
See? Simple stuff! Now let’s get to the fun part – making these beauties!
Equipment You’ll Need
Don’t stress—you won’t need any fancy gadgets for these pops! Here’s the short and sweet list of what’s essential:
- A microwave-safe bowl – My trusty glass mixing bowl has seen more melted chocolate than I can count. Just make sure whatever you use won’t get too hot to handle.
- Parchment paper – This is non-negotiable, folks! Without it, you’ll have chocolate-coated marshmallows stuck to your counter. Learned that one the hard way.
- Popsicle sticks – Already mentioned in ingredients, but worth repeating! I buy the 6-inch ones—perfect for little hands to hold without getting too messy.
- Small bowls for toppings (optional) – I raid my cupboard for little ramekins to hold sprinkles or crushed nuts. Makes decorating way easier!
That’s seriously it! No stand mixers, no special pans—just simple tools for maximum deliciousness.
How to Make Nostalgic Chocolate Fudge Stuffed Marshmallow Pops
Alright, let’s get to the fun part! Making these pops is seriously as easy as 1-2-3 (okay, maybe 1-2-3-4). I’ve made this recipe dozens of times, and I’ll walk you through every sticky, sweet step so yours turn out perfect.
Step 1: Prepare the Marshmallows
First things first – grab those fluffy marshmallows! Here’s my trick: gently press a popsicle stick into the flat bottom of each marshmallow, going about halfway up. You want it secure enough to hold the weight of the fudge, but not so far that it pokes out the top (been there, done that – not cute).
If your marshmallows are being stubborn, give them a little twist as you push the stick in. This helps anchor it better. I usually do this step while sitting at my kitchen table – it’s oddly satisfying work!
Step 2: Melt the Chocolate
Now for the magic shell! Dump your chocolate chips into that microwave-safe bowl and add the coconut oil if you’re using it (trust me, it makes life easier). Microwave in 30-second bursts, stirring well between each one. The chocolate will look weird and clumpy at first – don’t panic! Just keep stirring between heating sessions.
When it’s almost melted but still has a few solid bits, stop microwaving – the residual heat will finish the job as you stir. This prevents that awful burnt chocolate smell (we’ve all been there). The perfect dipping consistency should be like warm honey – smooth and pourable but not too thin.
Step 3: Coat and Decorate
Here’s where the real fun begins! Hold a marshmallow by the stick and dunk it straight down into the melted chocolate, swirling slightly to coat all sides. I like to let the excess drip off for about 5 seconds – this prevents messy pooling at the bottom.
While the chocolate’s still wet, roll or sprinkle on your toppings! My personal favorite method: hold the pop over a bowl of sprinkles and shower them on from above like edible confetti. For kids, I set up a “decorating station” with small bowls of different toppings – they go wild for this part!
Step 4: Let Them Set
This is the hardest part – waiting! Place each decorated pop on your parchment-lined tray. I like to stick them in the fridge for about 15-20 minutes to speed up the setting process, but room temperature works fine too if you’re not in a rush.
Pro tip: if you’re making these for a party, I recommend doing them the day before and storing them in an airtight container at room temp. The chocolate stays shiny and perfect that way. Now try not to eat them all before serving – I dare you!
Tips for Perfect Nostalgic Chocolate Fudge Stuffed Marshmallow Pops
After making dozens (okay, hundreds) of these pops, I’ve picked up some handy tricks to make sure yours turn out perfect every time:
- Chocolate matters! Splurge on good quality chocolate chips – they melt smoother and taste infinitely better than bargain brands. My favorite? Ghirardelli or Guittard.
- Coconut oil is your friend – Start with 1 tbsp, but don’t be afraid to add an extra teaspoon if your chocolate seems too thick for dipping.
- Patience with melting – Rushing the microwave will give you grainy chocolate. Slow and steady wins the race!
- Storage smarts – Keep these in an airtight container with parchment between layers. They’ll stay fresh for 3 days (if they last that long!).
- Quick fix – If your chocolate starts setting while you’re decorating, just pop the bowl back in the microwave for 10 seconds.
Remember – even the “mess-ups” still taste amazing! My first batch looked like abstract art but disappeared just as fast.
Variations for Your Nostalgic Chocolate Fudge Stuffed Marshmallow Pops
Oh, the possibilities! Once you’ve mastered the basic recipe, it’s time to get creative. Here are some of my favorite twists that keep these pops exciting every time I make them:
- White chocolate dream – Swap the semi-sweet chips for white chocolate and roll in crushed freeze-dried strawberries. Looks gorgeous and tastes like a chocolate-covered strawberry!
- Nutty professor – Use peanut butter fudge instead of chocolate and roll in crushed peanuts. My husband’s favorite – he says it’s like a peanut butter cup on a stick.
- Tropical twist – Coconut lovers, this one’s for you! Dip in dark chocolate and roll in toasted coconut flakes. Close your eyes and pretend you’re on a beach.
- Mocha madness – Add a teaspoon of instant espresso powder to your melted chocolate for grown-up pops. Dust with cocoa powder instead of sprinkles.
- Birthday bash – Use funfetti-flavored marshmallows and rainbow sprinkles. Instant party in every bite!
The best part? You can mix and match these ideas or come up with your own wild combinations. Last Christmas I did peppermint marshmallows dipped in dark chocolate with crushed candy canes – holiday magic! What will you create?
Serving and Storing Nostalgic Chocolate Fudge Stuffed Marshmallow Pops
Now for the best part – enjoying your handiwork! These pops taste absolutely magical when served fresh, with the chocolate shell still slightly crisp against the soft marshmallow. I love arranging them in a tall glass filled with colorful sprinkles at the bottom – makes for the cutest dessert display at parties!
If you’re storing them (who has that kind of willpower?), here’s my foolproof method:
- Layer them carefully in an airtight container with parchment paper between each pop. This prevents them from sticking together – no one wants a chocolate marshmallow brick!
- Room temp is best – The fridge can cause condensation that makes the chocolate sweat. Just tuck them in a cool spot away from direct sunlight.
- 3-day rule – They’ll stay fresh for about 3 days, though in my house they rarely make it past day one!
One important note – don’t try to microwave these if the chocolate hardens too much. Unlike regular fudge, the marshmallow inside gets weirdly hot while the chocolate stays firm. Trust me, I learned this the messy way! If you absolutely must soften them, let them sit at room temp for an hour instead.
These pops are perfect for packing in lunchboxes (wrap individually in wax paper) or as sweet surprises in gift bags. My neighbor’s kids go nuts when they see me coming with a tray of these – instant popularity!
Nutritional Information
Okay, let’s be real – we’re not eating these pops for their health benefits! But I know some folks like to keep track, so here’s the scoop on what’s in each delicious bite. Remember, these numbers are estimates and will change based on the exact ingredients you use (especially if you go wild with toppings like I do!).
- Serving size: 1 pop (because let’s be honest, who stops at half?)
- Calories: About 180 – worth every single one!
- Sugar: 24g (it’s basically a happy little sugar cloud on a stick)
- Fat: 8g (mostly from that glorious chocolate coating)
- Protein: 2g (hey, marshmallows have gelatin – that counts, right?)
The way I see it, these pops are really just bite-sized joy with some bonus calcium from the chocolate. Everything in moderation, friends – except maybe sprinkles. You can never have too many sprinkles!
Remember: Nutritional values are estimates and vary based on ingredients used. If you’re watching specific dietary needs, always check your particular brands and measurements. Now go enjoy that pop guilt-free – life’s too short not to!
Frequently Asked Questions
I’ve gotten so many questions about these pops over the years – here are the ones that pop up most often (see what I did there?). Don’t see your question? Drop it in the comments and I’ll answer faster than you can say “more sprinkles!”
Can I use homemade fudge instead of store-bought?
Absolutely! My grandma’s homemade fudge recipe is actually my secret weapon here. Just make sure it’s soft enough to work with – if your homemade fudge has set too firm, microwave it for 5-10 seconds to make it pliable. The flavor difference is incredible, though store-bought works perfectly in a pinch.
Why does my chocolate coating crack sometimes?
Oh, I’ve battled the crack monster too! Usually it happens if the marshmallows are too cold when you dip them (the temperature change shocks the chocolate). Let your marshmallows sit at room temp for 15 minutes before dipping. Also, adding that bit of coconut oil helps keep the chocolate flexible as it sets.
Are there nut-free options for school treats?
You bet! These are naturally nut-free if you skip toppings with nuts. For extra safety, use chocolate chips labeled “nut-free” (Enjoy Life brand is great). Instead of nuts, try colorful sprinkles, crushed pretzels, or mini M&Ms for that satisfying crunch.
Can I make these ahead for a party?
Yes! They actually hold up beautifully. Make them 1-2 days before and store in an airtight container at room temp. The chocolate stays shiny, and the marshmallows stay soft. Just don’t refrigerate them – that makes the marshmallows sweat and the chocolate bloom (get those white streaks).
Help! My marshmallows keep sliding off the sticks!
Been there, done that, got the chocolate-stained shirt! Try this trick: after inserting the stick, gently pinch the marshmallow base around it to create a tighter seal. Also, make sure you’re not overloading the marshmallow with too much fudge – a little goes a long way. If all else fails, a tiny dab of melted chocolate at the insertion point acts like edible glue!
Share Your Nostalgic Chocolate Fudge Stuffed Marshmallow Pops
Okay, I’ve shared all my secrets – now I want to see YOUR creations! There’s nothing I love more than scrolling through photos of these pops with all your personal twists. Did you try the peanut butter version? Go wild with edible glitter? Maybe your kiddos came up with a crazy new topping combo? Spill the marshmallow-filled beans!
Tag me on Instagram @SweetToothAdventures – I’ll feature my favorites in my stories! Or leave a comment below telling me about your experience. Did they disappear as fast as mine always do? Any brilliant new variations I should try? Your feedback and photos seriously make my day brighter than a bowl of rainbow sprinkles.
And hey – if you loved this recipe as much as I do, pay it forward! Share it with that friend who’s always looking for easy party treats or your cousin who thinks baking is too complicated. These pops are meant to be shared, just like all the best childhood memories.
Now go forth and create some sticky-sweet magic! Can’t wait to see what you come up with.
Print
15-Minute Nostalgic Chocolate Fudge Stuffed Marshmallow Pops You’ll Crave
- Total Time: 15 minutes
- Yield: 6 pops 1x
- Diet: Vegetarian
Description
A fun and nostalgic treat combining chocolate fudge and marshmallows on sticks for easy eating.
Ingredients
- 1 cup chocolate fudge
- 12 large marshmallows
- 6 wooden popsicle sticks
- 1/2 cup chocolate chips (for coating)
- 1 tbsp coconut oil (optional, for smoother melting)
- Sprinkles or toppings (optional)
Instructions
- Insert a popsicle stick halfway into each marshmallow.
- Melt the chocolate chips with coconut oil (if using) in a microwave-safe bowl in 30-second intervals, stirring until smooth.
- Dip each marshmallow into the melted chocolate, covering it completely.
- Roll the chocolate-coated marshmallow in sprinkles or toppings if desired.
- Place the pops on parchment paper to set for 15-20 minutes.
- Serve and enjoy.
Notes
- Use high-quality chocolate for better flavor.
- If the chocolate is too thick, add a little more coconut oil.
- Store in an airtight container for up to 3 days.
- Prep Time: 10 minutes
- Cook Time: 5 minutes
- Category: Dessert
- Method: No-Bake
- Cuisine: American
Nutrition
- Serving Size: 1 pop
- Calories: 180
- Sugar: 24g
- Sodium: 35mg
- Fat: 8g
- Saturated Fat: 5g
- Unsaturated Fat: 2g
- Trans Fat: 0g
- Carbohydrates: 28g
- Fiber: 1g
- Protein: 2g
- Cholesterol: 5mg


