
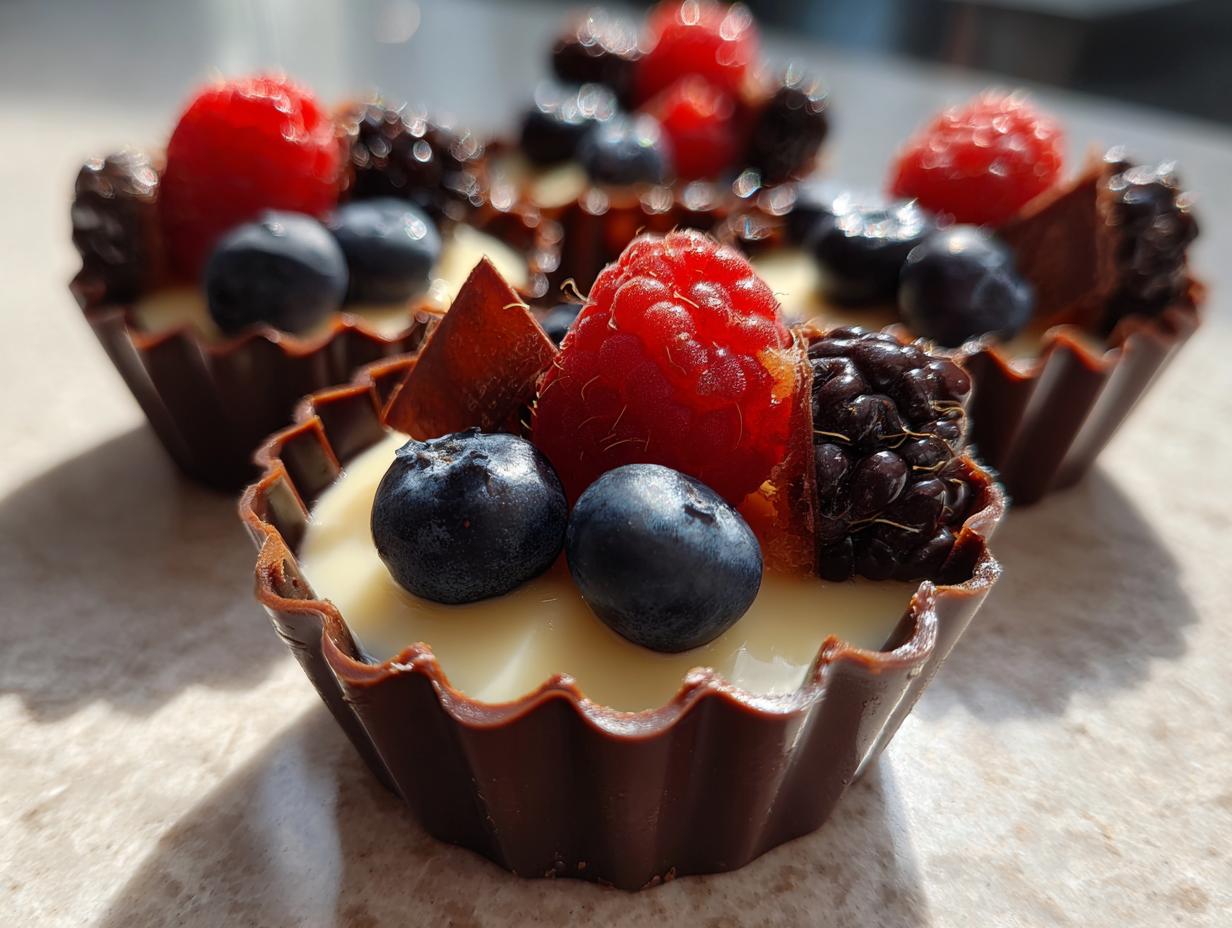
Oh my goodness, let me tell you about my absolute favorite dessert to impress guests – these Luxe No-Bake Panna Cotta Chocolate Cups! They’re like little edible jewels that combine Italy’s silky panna cotta with rich dark chocolate shells. I first served these at a dinner party last summer, and you should’ve seen everyone’s faces when I brought them out – total showstoppers! The best part? They’re ridiculously easy to make (shh, that’s our little secret). The creamy vanilla panna cotta melts in your mouth against the crisp chocolate cup – it’s pure magic. No oven required, just a bit of patience while they set up in the fridge. Trust me, once you try these, you’ll be making them for every special occasion!
Why You’ll Love These Luxe No-Bake Panna Cotta Chocolate Cups
Oh, where do I even start? These little beauties are like my secret weapon for stress-free entertaining. First off, no oven means no stress – perfect for summer when you don’t want to heat up the kitchen. The chocolate cups give that fancy restaurant vibe with zero fuss. I love how they sit happily in the fridge for a full day before serving – no last-minute panic!
But here’s the real magic: that heavenly contrast between the crisp chocolate shell and the wobbly, creamy panna cotta inside. It’s like biting into a cloud wrapped in silk. And presentation? Guests always think I spent hours, when really, the hardest part is waiting for them to set!
Ingredients for Luxe No-Bake Panna Cotta Chocolate Cups
Okay, let’s gather our treasures! For these dreamy cups, you’ll want chilled heavy cream – none of that half-and-half business, we’re going for pure luxury here. Grab some full-fat whole milk too – skim milk just won’t give us that velvety texture we’re after. The sugar? Just plain granulated works perfectly. Now, here’s where I get picky: use 70% dark chocolate, chopped – it balances the sweetness beautifully. And don’t forget the unflavored gelatin (trust me, flavored will ruin everything). A splash of pure vanilla extract and some fresh berries for garnish complete our lineup. Simple ingredients, extraordinary results!
Equipment Needed
Now, let’s talk tools! You’ll need just a few basics to make these showstoppers. Grab a small saucepan – I use my grandma’s old one for sentimental reasons, but any will do. Silicone molds are my secret for perfect chocolate cups – the mini muffin size works great. Don’t forget a pastry brush (that cheap one from the grocery store is fine) for painting on the chocolate. Round it out with measuring cups and spoons, and you’re all set! See? Nothing fancy required.
How to Make Luxe No-Bake Panna Cotta Chocolate Cups
Alright, let’s dive into the fun part! I promise this isn’t as intimidating as it looks – we’ll take it step by step. The key is patience and not rushing any of the stages. I’ve made these enough times to know exactly where beginners might stumble, so I’ll walk you through every detail!
Preparing the Chocolate Cups
First things first – those gorgeous chocolate shells! Melt your chopped dark chocolate gently (I use 30-second bursts in the microwave, stirring between each). Now here’s my trick: chill your silicone molds for 10 minutes first – this helps the chocolate set faster when you brush it on. Use your pastry brush to paint the chocolate in upward strokes, making sure to get nice, even coverage. Don’t worry about perfection – the rustic look is charming! Pop them back in the fridge for 10 minutes, then do a second thin coat for extra sturdiness. This double-layer method prevents any cracks later.
Making the Panna Cotta Mixture
While those chill, let’s make the creamy magic. Bloom your gelatin in cold water – this is crucial! It should look like applesauce after 5 minutes. Meanwhile, heat the cream, milk, and sugar just until tiny bubbles form around the edges – no boiling or you’ll curdle it! Remove from heat and whisk in the gelatin until completely dissolved (no lumps!). Add your vanilla last – the heat can make its flavor disappear if you add it too early. Let this cool for about 15 minutes – you want it warm but not hot when pouring into the chocolate cups.
Assembling and Setting
Time to bring it all together! Carefully pour the panna cotta mixture into your chocolate cups, filling almost to the top. Here’s where I use a measuring cup with a spout for control. Gently tap the molds on the counter to release any air bubbles. Now the hardest part – refrigerate for at least 4 hours (overnight is even better). I know, the wait is torture! When they’re set, the tops should jiggle slightly when nudged. To serve, just pop them out of the molds – they should release easily if your chocolate layers were thick enough.
Expert Tips for Perfect Luxe No-Bake Panna Cotta Chocolate Cups
Alright, let me share my hard-earned secrets for flawless cups every time! First, lumpy gelatin? Don’t panic – just strain the mixture through a fine sieve before pouring. For chocolate that cracks, make sure your molds are chilled and do two thin coats instead of one thick one. My biggest tip? Let the panna cotta mixture cool slightly before pouring into chocolate cups – too hot and it’ll melt your beautiful shells! If they stick, pop the molds in the freezer for 5 minutes – they’ll release like magic. And remember, patience is key – rushing the setting time leads to wobbly disasters!
Serving Suggestions for Luxe No-Bake Panna Cotta Chocolate Cups
Oh, the fun part – dressing these beauties up! I love topping them with fresh raspberries right before serving – the tartness cuts through the richness perfectly. For fancy dinners, I’ll drizzle a little raspberry coulis on the plate – looks gorgeous and tastes even better! These pair amazingly with espresso after dinner – the bitterness plays off the sweet creaminess. Want to go all out? Serve with a glass of Moscato d’Asti – the bubbles and peach notes make the chocolate sing!
Storage and Make-Ahead Instructions
Here’s why I adore these treats – they’re the ultimate make-ahead dessert! Once set, store them in an airtight container in the fridge for up to 3 days – the chocolate actually stays crisper this way. Need to plan further ahead? They freeze beautifully! Just wrap each cup in plastic wrap before freezing for up to a month. Thaw overnight in the fridge – the texture stays perfectly creamy. Pro tip: wait to add berry garnishes until right before serving so they stay fresh!
Luxe No-Bake Panna Cotta Chocolate Cups Variations
Oh, the possibilities! Once you’ve mastered the classic version, let’s play with flavors. My favorite twist? Orange zest in the panna cotta mixture – just a teaspoon transforms it into something magical with the dark chocolate. Feeling fancy? Swap the dark chocolate for white chocolate shells and add a drop of rosewater to the cream. For coffee lovers, stir in 1 tsp instant espresso powder to the warm milk mixture – it’s divine! And in summer, I sometimes fold in mashed raspberries for a pretty pink swirl. The best part? Each variation feels like a whole new dessert!
Nutritional Information
Just a quick note about the numbers – these are estimates based on the exact ingredients I use (like that 70% dark chocolate and full-fat dairy). Each luxe little cup comes in around 320 calories, with that beautiful balance of rich fats and just enough sweetness. Remember, nutritional values can change if you tweak the recipe – like using milk chocolate instead of dark. But hey, we’re making dessert here – sometimes you’ve just gotta indulge in life’s creamy little pleasures!
Frequently Asked Questions
I get so many questions about these little beauties – let me share the answers I’ve learned through trial and (many) delicious errors!
Can I use agar-agar instead of gelatin?
Absolutely! For vegetarian friends, agar-agar works like a charm. Use 1 tsp powder (about half the gelatin amount) dissolved in the warm milk mixture. The texture will be slightly firmer but still delightful. Just remember – agar needs to boil to activate, so let the mixture bubble for 30 seconds after adding it.
What’s the best way to unmold the chocolate cups?
Oh, this had me stumped at first! The secret? Wait until they’re fully set (patience!), then gently press the silicone mold from underneath while pulling the edges outward. If they resist, pop the whole mold in the freezer for 2 minutes – the chocolate contracts slightly and they’ll pop right out! No more cracked cups.
How long do they need to set?
Here’s where I messed up early on – don’t rush it! 4 hours minimum, but overnight is golden. The panna cotta continues firming up, so that extra time makes unmolding effortless. If they still jiggle like Jell-O after 4 hours, your gelatin might need adjusting next time.
Now I want to see your creations! Tag me on Instagram with your panna cotta chocolate cup masterpieces – I love seeing all your gorgeous variations and presentation ideas. Happy no-bake baking, friends!
Print
5-Ingredient Luxe No-Bake Panna Cotta Chocolate Cups – Heavenly Dessert
- Total Time: 4 hours 25 minutes
- Yield: 6 servings 1x
- Diet: Vegetarian
Description
A luxurious no-bake dessert featuring creamy panna cotta in chocolate cups. Perfect for elegant gatherings or a special treat.
Ingredients
- 1 cup heavy cream
- 1/2 cup whole milk
- 1/4 cup granulated sugar
- 1 tsp vanilla extract
- 1 1/2 tsp gelatin
- 2 tbsp cold water
- 4 oz dark chocolate, melted
- Fresh berries for garnish
Instructions
- Bloom gelatin in cold water for 5 minutes.
- Heat cream, milk, and sugar in a saucepan until steaming but not boiling.
- Remove from heat, stir in vanilla and bloomed gelatin until dissolved.
- Let cool slightly while preparing chocolate cups.
- Brush melted chocolate inside small silicone molds to form cups. Chill for 10 minutes.
- Pour panna cotta mixture into chocolate cups. Refrigerate for 4 hours or until set.
- Garnish with fresh berries before serving.
Notes
- Use high-quality chocolate for best results.
- Chill molds before brushing with chocolate for easier handling.
- Can be made 1 day ahead.
- Prep Time: 20 minutes
- Cook Time: 5 minutes
- Category: Dessert
- Method: No-Bake
- Cuisine: Italian
Nutrition
- Serving Size: 1 cup
- Calories: 320
- Sugar: 22g
- Sodium: 35mg
- Fat: 24g
- Saturated Fat: 15g
- Unsaturated Fat: 7g
- Trans Fat: 0g
- Carbohydrates: 25g
- Fiber: 2g
- Protein: 4g
- Cholesterol: 65mg


