

Oh my gosh, you HAVE to try these Chocolate Salted Caramel Bars—they’re the kind of dessert that makes people sneak seconds when they think no one’s looking! I first made them for a potluck years ago, and now I get requests every time there’s a gathering. That perfect balance of rich chocolate crust, gooey salted caramel, and just the right sprinkle of sea salt? Absolute magic. What I love most is how simple they are to throw together, yet they taste like you spent hours in the kitchen. Trust me, one bite and you’ll understand why these bars disappear faster than I can say “don’t eat them all at once!”
Why You’ll Love These Chocolate Salted Caramel Bars
Listen, these bars are basically dessert royalty in my house, and here’s why:
- Crazy easy—just mix, layer, and chill. No fancy skills needed!
- That sweet-salty combo hits every craving—rich chocolate, buttery caramel, and a sea salt kick.
- Total crowd-pleaser—kids, adults, even my picky aunt demand them at every family thing.
- They look fancy but take less effort than most cookies. (Your secret’s safe with me.)
Seriously, if you want a dessert that makes you look like a baking genius with minimal work? This is it.
Ingredients for Chocolate Salted Caramel Bars
Okay, let’s talk ingredients—this is where the magic starts! I’ve made these bars so many times I could probably recite this list in my sleep. But here’s the thing: using exactly what’s listed makes all the difference. (Trust me, I learned the hard way when I tried substituting margarine once—never again!) Here’s everything you’ll need:
- For the chocolate crust:
- 1 cup all-purpose flour (spooned and leveled—no packing!)
- ½ cup unsweetened cocoa powder (I use Dutch-processed for extra richness)
- ½ cup unsalted butter, melted and slightly cooled (real butter only—it’s non-negotiable)
- ½ cup granulated sugar
- ¼ teaspoon fine sea salt (this balances the sweetness perfectly)
- For the salted caramel layer:
- 1 can (14 oz) sweetened condensed milk (don’t grab evaporated milk by accident!)
- ½ cup packed dark brown sugar (the molasses flavor is key)
- 4 tablespoons unsalted butter (cut into chunks so it melts evenly)
- 1 teaspoon pure vanilla extract (imitation vanilla? In this house? Never.)
- For finishing:
- 1 cup semi-sweet chocolate chips (or chop up a good quality bar if you’re feeling fancy)
- ½ teaspoon flaky sea salt for sprinkling (Maldon is my go-to—those flakes are *chef’s kiss*)

See? Nothing weird or hard-to-find here. Just simple, quality ingredients that work together like best friends. Now let’s get baking!
Equipment You’ll Need
Don’t worry—you won’t need any fancy gadgets for these bars! Just grab:
- An 8×8-inch baking pan (this is the perfect size for thick, fudgy layers)
- Parchment paper (for easy lifting—no stuck-on crust disasters!)
- A medium saucepan (for that dreamy caramel)
- Two mixing bowls (one for crust, one for melting chocolate)
- A wooden spoon or spatula (for stirring like you mean it)
That’s it! Now let’s make some magic happen.
How to Make Chocolate Salted Caramel Bars
Alright, let’s get to the fun part! I promise this is easier than it looks – just follow these steps and you’ll have bars that’ll make everyone think you’re a pastry chef. The key is taking your time with each layer. No rushing – good things come to those who wait (and bake)!
Step 1: Prepare the Chocolate Crust
First things first: preheat that oven to 350°F (175°C). While it’s heating, grab a medium bowl and toss in your flour, cocoa powder, sugar, and salt. Give it a quick whisk to banish any lumps – nobody wants a surprise pocket of dry cocoa!
Now pour in that melted butter (make sure it’s cooled slightly so it doesn’t cook the flour) and mix until it looks like wet sand. The dough will be thick – that’s perfect! Press it firmly into your parchment-lined 8×8 pan. I mean really pack it down – use the bottom of a measuring cup if your fingers aren’t cutting it.
Pop it in the oven for exactly 10 minutes. Set a timer! When it comes out, let it cool completely – about 30 minutes. This cooling time is crucial because if you pour hot caramel on a hot crust, you’ll get a mushy mess (been there, regretted that).

Step 2: Make the Salted Caramel Layer
While the crust chills (literally), let’s make that gorgeous caramel. Combine the sweetened condensed milk, brown sugar, butter, and vanilla in your saucepan over medium heat. Now here’s where you need patience – stir constantly with a wooden spoon for about 7-10 minutes.
You’ll know it’s ready when it thickens enough that when you drag the spoon across the bottom, you can see the pan for a second before it flows back together. It should be the consistency of warm pudding. Too thin and it’ll ooze everywhere, too thick and it’ll be hard to spread – but don’t worry, you’ll get the hang of it!
Pour this golden goodness over your cooled crust and immediately sprinkle with half the sea salt. The heat helps the salt crystals stick. Let this layer set for about 15 minutes before adding the chocolate.
Step 3: Assemble and Chill
Almost there! Melt your chocolate chips in a microwave-safe bowl in 30-second bursts, stirring between each one. (Burn chocolate once and you’ll never rush this step again!) When it’s smooth and glossy, pour it over the caramel layer and gently spread it to the edges.
Here’s the magic touch: sprinkle the remaining sea salt over the warm chocolate. The contrast of flavors is everything! Now comes the hardest part – walk away. Let these beauties chill in the fridge for at least 2 hours, preferably 4. I know, the wait is torture, but cutting into them too soon means messy, squished bars.
When they’re properly set, lift them out using the parchment paper and cut into squares with a sharp knife (wipe it clean between cuts for perfect edges). Now try not to eat them all before sharing – I believe in you!

Tips for Perfect Chocolate Salted Caramel Bars
After making these bars more times than I can count, here are my hard-won secrets for perfection:
- Knife trick: Run your sharp knife under hot water and wipe dry before each cut—it slices through chilled chocolate like butter.
- Salt control: Sprinkle sea salt from high up for even distribution. Taste your salt first—some brands are saltier than others!
- Storage smarts: Layer parchment between bars in your airtight container to prevent sticking. They’ll stay perfect for days (if they last that long).
- Caramel rescue: If your caramel seizes up, add 1 tsp warm milk and stir vigorously—it’ll smooth right out.
These little touches make all the difference between good bars and “OMG what is this magic?!” bars.
Variations and Substitutions
Want to mix things up? Try dark chocolate chips for extra richness, or swap in gluten-free flour 1:1 if needed. No brown sugar? Use white sugar plus 1 tbsp molasses. For a nutty twist, sprinkle chopped pecans between layers. The possibilities are endless—make it yours!
Serving and Storing Chocolate Salted Caramel Bars
Okay, let’s talk about the best part—eating these beauties! For serving, I always let them sit at room temp for 10 minutes after pulling them from the fridge. That little bit of warmth makes the caramel layer just ooze perfectly when you take a bite. (Trust me, it’s worth the wait!)
Now, storing them is easy-peasy—just layer them between sheets of parchment in an airtight container. They’ll stay fresh at room temp for 2 days, or in the fridge for up to 5 days (if they last that long in your house—mine never do). The chocolate might sweat a little when they come to room temp, but that just adds to the homemade charm!
Pro tip: If you want to serve them warm (hello, melty caramel!), pop individual squares in the microwave for exactly 8 seconds. Any longer and you’ll have caramel soup—which, okay, still tastes amazing, but isn’t quite as photogenic. For parties, I arrange them on a platter and let guests grab them at room temp—they disappear faster than you can say “seconds please!” You can find more inspiration for delicious treats on Pinterest.
Nutritional Information
Okay, let’s be real – we’re not eating these Chocolate Salted Caramel Bars for their health benefits! But since folks always ask, here’s the scoop on what’s in each delicious square (based on cutting the pan into 12 equal bars):
- Calories: About 250 per bar (worth every single one!)
- Fat: 12g (mostly from all that glorious butter and chocolate)
- Saturated Fat: 7g (hey, that’s what makes them rich and delicious)
- Carbs: 32g (mostly from the sugars and flour)
- Fiber: 2g (thanks to that cocoa powder!)
- Protein: 3g (a nice little bonus from the milk and flour)
- Sodium: 150mg (the perfect balance with the sweet)
Important note: These numbers can vary based on specific brands you use and how big you cut your bars. (No judgment if you make them extra-large – I’ve been there!) And remember, these are treats to enjoy in moderation… or not, depending on how strong your willpower is around chocolate and caramel!
Frequently Asked Questions
Over the years, I’ve gotten so many questions about these Chocolate Salted Caramel Bars – here are the ones that pop up most often!
Can I use store-bought caramel sauce instead of making my own?
Technically yes, but I wouldn’t recommend it! The homemade caramel layer is thicker and sets better than most store-bought sauces. If you’re in a pinch, look for a caramel filling (not sauce) and reduce the amount slightly since it’s usually thinner.
Help! My bars keep crumbling when I cut them – what am I doing wrong?
Oh honey, I feel your pain! The key is making sure each layer is completely cooled before adding the next. Also, chill them for at least 2 hours (I know, the wait is torture!) and use a sharp knife dipped in hot water between cuts. If they’re still falling apart, try cutting smaller pieces – sometimes less surface area helps them hold together better.
Can I freeze these bars for later?
Absolutely! Wrap them tightly in plastic wrap then foil, and they’ll keep beautifully for up to 3 months. Thaw overnight in the fridge – the texture stays perfect. (Though I won’t judge if you sneak one straight from the freezer – frozen caramel has its own special charm!)
Why did my caramel turn grainy?
This usually happens if the sugar wasn’t fully dissolved before the mixture started boiling. Next time, stir constantly on medium heat (not high!) until all the sugar dissolves completely before letting it bubble. If it happens again, don’t panic – the taste is still amazing, just the texture’s a little rustic!
Can I double this recipe?
You bet! Just use a 9×13-inch pan instead and add about 5 minutes to the crust baking time. The caramel might take a few extra minutes to thicken too since there’s more volume. Everything else stays the same – easy peasy!
Now that you’re armed with all my hard-earned tips, it’s your turn! Try this recipe and share your results – I’d love to hear how your Chocolate Salted Caramel Bars turn out. Tag me if you post photos (and try not to eat them all before the photo shoot – no shame if you do!)
Print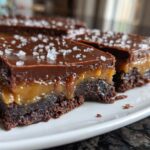
Irresistible Chocolate Salted Caramel Bars in Just 4 Steps
- Total Time: 35 minutes
- Yield: 12 bars 1x
- Diet: Vegetarian
Description
Rich chocolate bars with a salted caramel layer, perfect for dessert lovers.
Ingredients
- 1 cup all-purpose flour
- 1/2 cup cocoa powder
- 1/2 cup unsalted butter, melted
- 1/2 cup granulated sugar
- 1/4 tsp salt
- 1 can (14 oz) sweetened condensed milk
- 1/2 cup brown sugar
- 4 tbsp unsalted butter
- 1 tsp vanilla extract
- 1/2 tsp sea salt
- 1 cup chocolate chips
Instructions
- Preheat oven to 350°F (175°C).
- Mix flour, cocoa powder, melted butter, granulated sugar, and salt in a bowl.
- Press the mixture into a lined baking pan.
- Bake for 10 minutes, then let cool.
- Cook sweetened condensed milk, brown sugar, butter, and vanilla in a saucepan until thickened.
- Pour caramel over the crust and sprinkle with sea salt.
- Melt chocolate chips and spread over caramel.
- Chill for 2 hours before cutting into bars.
Notes
- Store in an airtight container for up to 5 days.
- Use a sharp knife to cut clean slices.
- Adjust sea salt to taste.
- Prep Time: 15 minutes
- Cook Time: 20 minutes
- Category: Dessert
- Method: Baking
- Cuisine: American
Nutrition
- Serving Size: 1 bar
- Calories: 250
- Sugar: 20g
- Sodium: 150mg
- Fat: 12g
- Saturated Fat: 7g
- Unsaturated Fat: 4g
- Trans Fat: 0g
- Carbohydrates: 32g
- Fiber: 2g
- Protein: 3g
- Cholesterol: 25mg


