
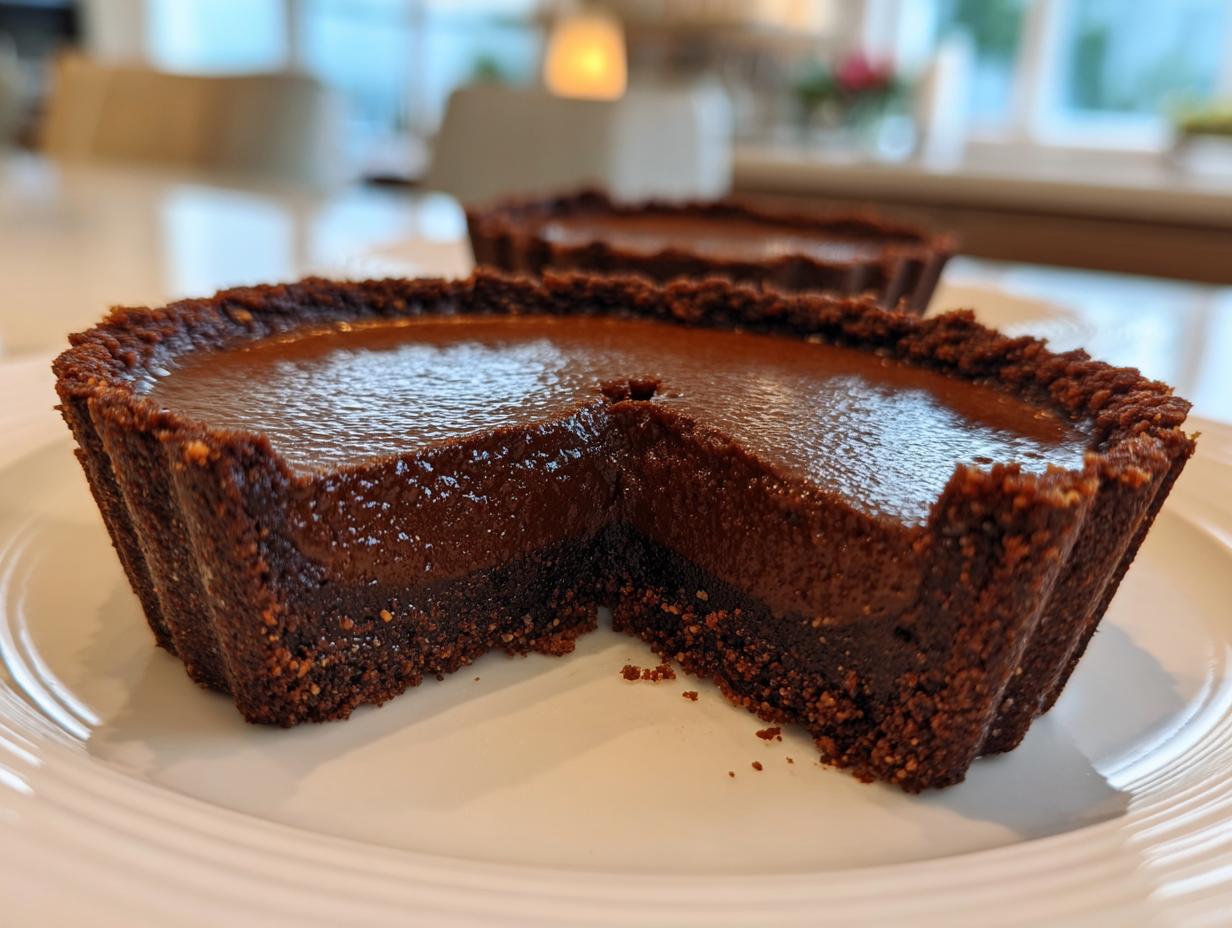
Oh my goodness, you have to try these chocolate espresso tarts! They’re my secret weapon for when I want to impress guests but don’t want to spend all day in the kitchen. That perfect moment when rich, dark chocolate meets bold espresso – it’s like the best coffee date you’ve ever had, but in dessert form. The first time I made these for a dinner party, my friends actually stopped mid-conversation to savor the first bite (true story!). What I love most is how simple they are – just a buttery cocoa crust filled with the smoothest ganache infused with real espresso flavor. They look so fancy in their little tart shells, but honestly, the hardest part is waiting those two hours for them to set in the fridge! These have become my go-to for birthdays, dinner parties, or honestly… just when I need a little chocolate pick-me-up on a Tuesday afternoon.
Ingredients for Chocolate Espresso Tarts
You know what makes these tarts so special? It’s all about using just the right ingredients – and treating them right! Here’s everything you’ll need, plus a few little insider tips I’ve picked up after making these dozens of times. Trust me, it’s worth measuring everything precisely – baking is science, after all!
- 1 1/2 cups all-purpose flour – Spoon it into your measuring cup and level it off, don’t scoop!
- 1/4 cup cocoa powder – I prefer Dutch-process for its deep chocolate flavor
- 1/2 cup unsalted butter, chilled – Cut this into cubes and keep it cold until the very last second
- 1/4 cup powdered sugar – This gives our crust that perfect delicate sweetness
- 1 egg yolk – Save the white for breakfast omelets!
- 1 tbsp cold water – Ice cold is best for keeping the dough tender
- 1 cup dark chocolate, chopped – Go for at least 70% cacao – the better the chocolate, the better the tart
- 1/2 cup heavy cream – None of that half-and-half business here
- 1 tbsp espresso powder – The real magic ingredient that makes these tarts unforgettable
- 1 tsp vanilla extract – Pure only, please!
Optional but amazing: A pinch of flaky sea salt on top before serving. It might sound weird, but that salty crunch takes these tarts to a whole new level!
How to Make Chocolate Espresso Tarts
Alright, let’s get baking! Don’t let the fancy look of these tarts intimidate you – I’ll walk you through each step. The secret is taking it slow and enjoying the process. There’s something almost meditative about making these, from the rhythmic cutting of butter into flour to watching that glossy ganache come together. Just wait until your kitchen smells like a Parisian patisserie!
Preparing the Tart Shells
First things first – the crust! This cocoa pastry is what makes these tarts stand out from ordinary chocolate desserts. Start by whisking together your flour, cocoa powder, and powdered sugar in a big bowl. Now for the fun part – take your chilled butter cubes and work them into the dry ingredients with your fingers or a pastry cutter. You want it to look like coarse sand with some pea-sized butter bits remaining – that’s what gives us that perfect flaky texture.
Next, make a well in the center and add your egg yolk and that tablespoon of ice water. Use a fork to gently mix until the dough just comes together. Here’s my pro tip: if it looks too dry, add another teaspoon of water, but don’t overdo it! Turn the dough out onto some plastic wrap, pat it into a disc, and chill for at least 30 minutes. This resting time prevents the dreaded crust shrinkage later.
When you’re ready, roll the dough out between two sheets of parchment (so much easier than flouring your counter!). Press it gently into your tart molds, trimming any excess. Pop them in the freezer for 15 minutes – yes, again! – then bake at 350°F for about 15 minutes until they look dry and smell amazing. Let them cool completely before filling.

Making the Chocolate Espresso Filling
Oh, this is where the magic happens! While your tart shells cool, let’s make that luscious filling. Start by chopping your chocolate into small pieces – the smaller they are, the easier they’ll melt. Put them in a heatproof bowl and set aside.
In a small saucepan, heat your heavy cream over medium heat just until you see small bubbles around the edges. Remove it from the heat and whisk in that glorious espresso powder until it’s completely dissolved. Now, pour this heavenly scented cream over your chopped chocolate and let it sit for a minute – no stirring yet! This waiting period helps the chocolate melt evenly.
After a minute, start stirring gently from the center outward until you’ve got the smoothest, shiniest ganache you’ve ever seen. Stir in the vanilla, and if you’re feeling fancy, a tiny pinch of salt. Your kitchen should smell incredible right now!

Assembling and Chilling
Almost there! Carefully pour your still-warm ganache into the cooled tart shells. I like to fill them almost to the top for that professional bakery look. Here’s where patience comes in – you’ll need to let these beauties chill in the fridge for at least 2 hours to set properly. I know, I know, the wait is torture! But trust me, slicing into a perfectly set tart is worth it.
When you’re ready to serve, you can dust them with cocoa powder, add some whipped cream, or go for my favorite – that flaky sea salt sprinkle I mentioned earlier. Each bite should give you that perfect crisp crust giving way to silky espresso-chocolate bliss. Now go impress your friends with your new baking skills!
Tips for Perfect Chocolate Espresso Tarts
After making these tarts more times than I can count (and learning from all my mistakes!), I’ve collected some foolproof tips to guarantee perfect results every time. These little tricks make all the difference between good tarts and “oh-my-goodness-can-I-have-your-recipe” tarts!
Invest in good chocolate
This is my golden rule – never skimp on the chocolate! That supermarket baking chocolate just won’t give you the same rich, complex flavor as a quality dark chocolate bar. Look for at least 70% cacao content from reputable brands. I promise you’ll taste the difference in every velvety bite.
Don’t rush the chilling steps
I know – waiting is the hardest part! But when the recipe says to chill the dough or let the tarts set, it’s not just busywork. That initial 30-minute dough rest prevents shrinkage, and the final 2-hour chill ensures your ganache sets up perfectly. Set a timer if you must, but don’t peek early!
Strain your ganache
For the smoothest possible filling, pour your finished ganache through a fine-mesh sieve. This catches any stubborn chocolate bits or undissolved espresso powder that might have snuck in. It only takes an extra minute but gives you that professional bakery-quality texture.
Watch those tart shells like a hawk
Overbaked shells turn from delicate and crisp to hard and bitter in seconds. Set your timer for 12 minutes and start checking – they’re done when they look dry and smell chocolatey, not when they’re dark brown. Remember, they’ll continue to firm up as they cool.
Room temperature is your friend
Let your finished tarts sit at room temperature for about 10 minutes before serving. That slight warming makes the flavors bloom and gives you the perfect texture – cool and firm but not refrigerator-cold. (Though I won’t judge if you sneak one straight from the fridge at midnight!)
Ingredient Substitutions
Okay, let’s talk swaps! While I absolutely swear by the original recipe, I get that sometimes you need to make adjustments based on what’s in your pantry or dietary needs. Here’s my tried-and-true guide to substitutions that work (and a few that don’t) – learned through lots of delicious trial and error!
Chocolate Choices
If dark chocolate isn’t your thing, you can use semi-sweet or even milk chocolate – just know the tarts will be sweeter and less intense. For an ultra-luxurious version, try a mix of dark chocolate and a tablespoon of high-quality cocoa butter to amp up the smoothness. White chocolate? Not recommended – it lacks cocoa solids and won’t set properly.
Dairy-Free Options
My vegan friends, I’ve got you covered! Swap the butter in the crust for cold coconut oil (measure it solid) and use full-fat coconut milk instead of heavy cream. The flavor changes slightly, but you still get that gorgeous silky texture. Just avoid nut milks – they’re too thin and won’t create proper ganache.
Espresso Powder Alternatives
No espresso powder? You can use 2 tablespoons of very strongly brewed espresso (cooled) instead – just reduce the heavy cream by the same amount. Instant coffee works in a pinch, but use half the amount since it’s more bitter. Skip the coffee altogether if you must, but you’ll lose that magical depth of flavor.
Flour Swaps
For gluten-free crusts, I’ve had success with a 1:1 gluten-free flour blend (look for one with xanthan gum). Almond flour doesn’t work here – it’s too crumbly. Whole wheat flour makes the crust taste oddly savory, so I’d avoid that too.
One swap I never recommend: Margarine instead of butter in the crust. It just doesn’t behave the same way when making pastry, and the flavor? Bleh. Some things are worth the real deal!
Serving Suggestions
Now for my favorite part – making these chocolate espresso tarts look as gorgeous as they taste! Presentation is everything when you’re serving something this special. Here are my go-to ways to dress up these beauties, whether it’s a fancy dinner party or just treating yourself on a Wednesday night.
The Classic Whipped Cream Cloud
You can’t go wrong with a dollop of freshly whipped cream on top – it’s like putting a fluffy white hat on your tart! I like to whip mine with just a hint of powdered sugar and vanilla. For extra flair, pipe it using a star tip or just spoon it on casually for that “rustic chic” look. A light dusting of cocoa powder or espresso powder over the cream adds beautiful contrast.
Berry Beautiful Accents
Fresh raspberries or strawberries are my secret weapons for color and brightness. Their tartness cuts through the rich chocolate perfectly. Arrange a few berries on each plate around the tart, or place one perfect berry right in the center. In winter when fresh berries aren’t great, a spoonful of raspberry jam underneath the tart works wonders!
Crunchy Contrast
That flaky sea salt I mentioned earlier? Game changer. But for extra texture, try toasted chopped hazelnuts or almonds scattered on top. The nuttiness pairs amazingly with the coffee flavor. If you’re feeling extra, a delicate chocolate curl or two makes everything look instantly professional.
Plating Like a Pro
For dinner parties, I love using simple white plates to let the dark chocolate shine. A light drizzle of chocolate sauce or caramel on the plate before placing the tart makes it look straight from a restaurant. Dust the rim of the plate with cocoa powder using a small sieve – it’s such an easy trick that looks impressive!
Pro tip: Serve these with small forks – they’re rich enough that people will want to savor them slowly. And always, always have extra napkins handy. Chocolate this good deserves to be enjoyed without worrying about messy fingers!
Storing Chocolate Espresso Tarts
Here’s the good news – these tarts actually taste even better the next day as the flavors continue to develop! But you’ll want to store them properly to keep that perfect texture. After years of testing (and occasional tart tragedies), here’s exactly what works and what doesn’t.
Refrigeration is key
The ganache filling means these tarts need to stay chilled. Pop them in an airtight container in the fridge, and they’ll stay perfect for up to 5 days. I like to place parchment between layers if stacking them to prevent sticking. That first bite of a day-old tart? Absolute magic – the espresso flavor really comes forward!
The freezing debate
I know freezing seems like a great idea, but trust me on this one – don’t do it! The ganache develops an odd grainy texture when frozen and thawed, and the crust loses its delicate crispness. I learned this the hard way before my sister’s baby shower (thank goodness I did a test batch!). If you must freeze, the unbaked dough freezes beautifully for up to 3 months.
Bringing them back to life
Straight-from-the-fridge tarts can be a bit too firm. Let them sit at room temperature for about 10 minutes before serving – just enough to take the chill off without making the ganache too soft. If you’re reheating leftover tarts (yes, as if there will be leftovers!), a quick 5 seconds in the microwave works, but watch closely – chocolate goes from perfect to puddle in seconds!
Pro tip: Store any extra ganache filling separately in the fridge for up to a week. It makes amazing hot chocolate when whisked into warm milk – the perfect way to extend the deliciousness!
Nutritional Information
Let’s be real – we’re not eating chocolate espresso tarts for their health benefits! But since you might be curious (or need to track for dietary reasons), here’s the nutritional breakdown per tart based on my exact recipe. Remember, these numbers can vary slightly depending on your specific ingredients – that fancy 85% dark chocolate will have different stats than the 70% I typically use!
- Calories: 320 – It’s a treat, but not crazy indulgent
- Fat: 22g (13g saturated) – Mostly from that glorious butter and chocolate
- Carbohydrates: 28g – The perfect balance of sweet and rich
- Fiber: 3g – Thank you, cocoa powder!
- Sugar: 18g – Almost all from the chocolate and powdered sugar
- Protein: 4g – A little boost from the egg and flour
- Sodium: 25mg – Naturally low unless you add that sea salt topping
Important note: These numbers are estimates based on standard ingredients. Your exact values might differ depending on brand choices (especially for chocolate and butter) and how precisely you measure. If you’re watching specific nutrients closely, it’s always best to calculate based on your exact products using a nutrition calculator.
Now that we’ve gotten the numbers out of the way – go enjoy your tart guilt-free! Life’s too short not to savor perfect chocolate desserts.
Common Questions About Chocolate Espresso Tarts
After sharing this recipe with so many friends, I’ve heard all the questions! Here are the answers to the ones that come up most often. Save yourself some trial and error with these hard-won tips from my kitchen experiments (and yes, a few happy accidents).
Can I use instant coffee instead of espresso powder?
Absolutely, in a pinch! Use half the amount (about 1 1/2 teaspoons) since instant coffee tends to be more bitter. Dissolve it completely in the warm cream before adding to the chocolate. But fair warning – the flavor won’t be quite as rich and complex as proper espresso powder.
Help! My ganache cracked – can I fix it?
Don’t panic! This happens if the ganache cools too quickly. Place the bowl over a pot of barely simmering water and stir gently until smooth again. If it’s already in the shells, a quick pass with a kitchen torch or quick broil can help – just watch closely! Next time, let your ganache cool slightly before pouring to prevent cracks.
Can I make mini tarts instead?
Yes, and they’re adorable! Use mini tart pans and reduce baking time to about 10 minutes. The filling amount stays the same – you’ll just get more little treasures to share (or not share – no judgment here). Perfect for parties where people want to try multiple desserts!
Why did my crust shrink so much?
Ah, the dreaded shrinkage! Two culprits: not chilling the dough long enough before baking, or stretching it when pressing into the pan. Make sure to chill the shaped crust for at least 15 minutes in the freezer before baking, and press gently without pulling the dough. Those extra minutes make all the difference!
Can I make these ahead for a party?
You’re speaking my language! The shells can be baked 2 days ahead – store at room temp in an airtight container. Make the ganache filling up to 3 days ahead (keep refrigerated), then gently reheat and pour into shells the morning of your event. They’ll be perfect by dessert time!
Go Make Some Chocolate Espresso Magic!
Now that you’ve got all my best tips and tricks, it’s time to get baking! Don’t be surprised if these chocolate espresso tarts become your new signature dessert – they have a way of turning first-time bakers into absolute rock stars. I still remember the thrill of pulling my first perfect batch from the oven (even if the edges were slightly lopsided). The best part? Sharing them! Snap a pic of your beautiful tarts and tag me – I love seeing your creations almost as much as I love eating them. Got questions? Stuck on a step? Drop me a comment below, and I’ll help troubleshoot like we’re standing side by side in the kitchen. Happy baking, and may your ganache always be smooth and your crusts perfectly crisp!
For more dessert inspiration, check out my Pinterest board!
Print
“Savory Chocolate Espresso Tarts – 5-Star Dessert Magic in 2 Hours”
- Total Time: 2 hours 35 minutes
- Yield: 6 tarts 1x
- Diet: Vegetarian
Description
Rich chocolate tarts infused with espresso, perfect for dessert.
Ingredients
- 1 1/2 cups all-purpose flour
- 1/4 cup cocoa powder
- 1/2 cup unsalted butter, chilled
- 1/4 cup powdered sugar
- 1 egg yolk
- 1 tbsp cold water
- 1 cup dark chocolate, chopped
- 1/2 cup heavy cream
- 1 tbsp espresso powder
- 1 tsp vanilla extract
Instructions
- Preheat oven to 350°F (175°C).
- Mix flour, cocoa powder, and powdered sugar in a bowl.
- Cut in chilled butter until mixture resembles crumbs.
- Add egg yolk and cold water, mix until dough forms.
- Press dough into tart molds and bake for 15 minutes.
- Heat cream and espresso powder until simmering.
- Pour over chopped chocolate, stir until smooth.
- Add vanilla extract, mix well.
- Pour filling into baked tart shells.
- Chill for 2 hours before serving.
Notes
- Use high-quality dark chocolate for best results.
- Chill dough before baking to prevent shrinking.
- Store leftovers in the refrigerator.
- Prep Time: 20 minutes
- Cook Time: 15 minutes
- Category: Dessert
- Method: Baking
- Cuisine: International
Nutrition
- Serving Size: 1 tart
- Calories: 320
- Sugar: 18g
- Sodium: 25mg
- Fat: 22g
- Saturated Fat: 13g
- Unsaturated Fat: 7g
- Trans Fat: 0g
- Carbohydrates: 28g
- Fiber: 3g
- Protein: 4g
- Cholesterol: 65mg


