
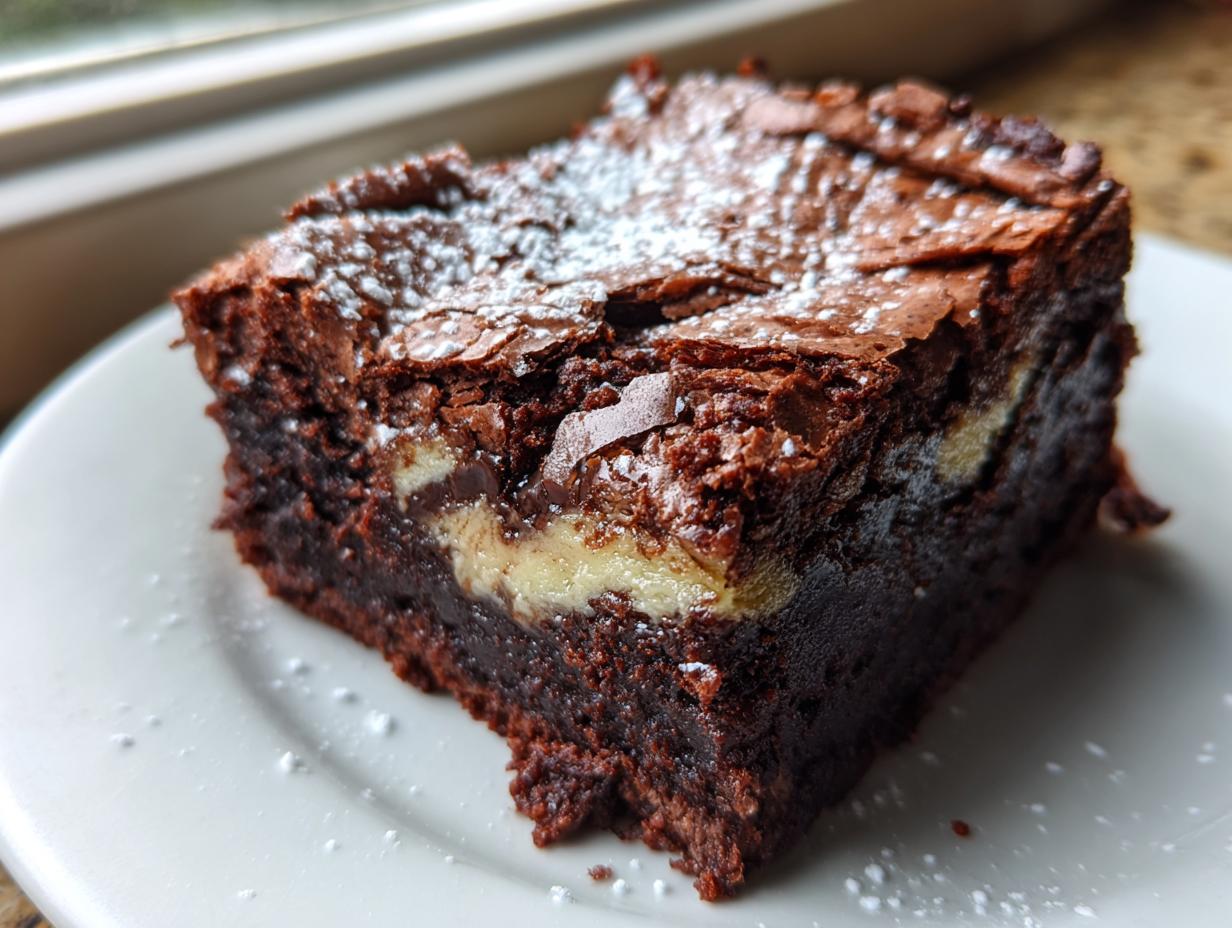
Oh my goodness, let me tell you about these chocolate cheesecake brownie bars – they’re the kind of dessert that makes you close your eyes and sigh after the first bite. I’ve been making this recipe for years, ever since my college roommate’s mom shared it with me during finals week (best study fuel ever!). What makes them so special? That magical combo of dense, fudgy brownie and creamy cheesecake swirls that melt in your mouth.
The first time I made these, I’ll admit I messed up the swirling technique – it looked more like abstract art than pretty marble patterns. But you know what? They still tasted incredible. That’s the beauty of this recipe – even when it’s not picture-perfect, the rich chocolate and tangy cheesecake flavors always shine through. Now I make them for every potluck, and people literally follow me around asking for the recipe.

The Must-Have Ingredients for Chocolate Cheesecake Brownie Bars
Okay, let’s talk ingredients – because using the right stuff makes all the difference between good brownie bars and “oh my gosh I need the whole pan” brownie bars. I’ve learned the hard way that shortcuts here just don’t pay off. Here’s what you’ll need, with my tried-and-true notes:
- 1 cup all-purpose flour – I always spoon and level mine to avoid dense brownies
- 1/2 cup cocoa powder – sift this! Those little lumps never fully mix in otherwise
- 1/2 teaspoon salt – trust me, it balances the sweetness perfectly
- 1 cup unsalted butter, melted – I microwave mine in 20-second bursts to avoid burning
- 2 cups granulated sugar – yes, it seems like a lot, but the cheesecake layer needs this balance
- 4 large eggs – room temperature eggs mix in so much better
- 1 teaspoon vanilla extract – the real stuff, not imitation
Now for the cheesecake magic:
- 8 oz cream cheese, softened – I leave mine out for at least 2 hours (no cheating with the microwave!)
- 1/4 cup sour cream – this is the secret for ultra-creamy texture
- 1/2 cup powdered sugar – sift this too if you want super smooth swirls
Pro tip: Set everything out on the counter before you start. There’s nothing worse than realizing your cream cheese is still rock-hard when you’re ready to mix!
How to Make Chocolate Cheesecake Brownie Bars
Alright, let’s get baking! I promise this isn’t as complicated as it looks – we’re just making two delicious layers and swirling them together. Follow these steps, and you’ll have the most amazing chocolate cheesecake brownie bars that’ll make you feel like a pastry chef.
Preparing the Brownie Batter
First things first – preheat that oven to 350°F (175°C). While it’s heating up, grab your biggest mixing bowl and whisk together the flour, cocoa powder, and salt. I like to sift them through a fine mesh strainer to avoid any cocoa lumps – nothing worse than biting into a dry pocket of powder!
In another bowl (yes, you’ll need two bowls – but it’s worth it!), mix the melted butter and granulated sugar until they’re best friends. Then add the eggs one at a time, mixing well after each addition. This is crucial – if you dump all the eggs in at once, the batter won’t emulsify properly. Finish with the vanilla and watch how the batter turns glossy and smooth.
Now, gently fold the dry ingredients into the wet mixture. Don’t overmix! Just stir until you don’t see any flour streaks. The batter should be thick and fudgy – if it looks runny, you probably forgot the flour (been there!).
Making the Cheesecake Layer
Time for the creamy magic! In a clean bowl (I know, another bowl – but we’re almost done!), beat the softened cream cheese until it’s completely smooth. No lumps allowed here! Add the sour cream and powdered sugar, and keep beating until it’s silky and dreamy. If you see any stubborn lumps, just keep mixing – they’ll eventually surrender.
Here’s my little trick: I like to taste the cheesecake mixture at this point (just a tiny spoonful!) to make sure it’s perfectly sweet and tangy. Sometimes I’ll add an extra pinch of powdered sugar if it needs it. Don’t judge me – quality control is important!
Baking and Swirling
Now for the fun part! Spread about 3/4 of the brownie batter into your prepared pan. It’ll be thick, so use a spatula to press it evenly into the corners. Then dollop the cheesecake mixture all over the top – I like to use a tablespoon and make little mounds about 2 inches apart.
Drop the remaining brownie batter in small spoonfuls between the cheesecake dollops. Grab a butter knife and make beautiful swirls by dragging it through the layers in S-shaped motions. Don’t overdo it – 4-5 passes is plenty. You want distinct swirls, not mud!

Bake for 30-35 minutes. The edges should be set, and a toothpick inserted in the center should come out with moist crumbs (not wet batter). Here’s the hardest part – let them cool completely in the pan before cutting! I know it’s tempting, but warm brownie bars fall apart. I usually wait at least 2 hours, or pop them in the fridge if I’m impatient.
Tips for Perfect Chocolate Cheesecake Brownie Bars
After making these more times than I can count (okay fine, I may have a slight obsession), I’ve picked up some tricks that take them from good to “can I marry these?” levels of amazing. Here are my absolute must-know tips:
- Room temperature ingredients aren’t optional – I know, I know, waiting is hard. But cold cream cheese will never get smooth, and cold eggs make the batter separate. Plan ahead!
- The cooling wait is brutal but necessary – Cut into warm brownie bars, and you’ll have a gooey mess (delicious, but not pretty). I set a timer for 2 hours to stop myself from sneaking bites.
- Use dental floss to cut clean slices – Wrap plain, unwaxed floss around your fingers and gently saw through the bars. No more squished edges!
- Freeze extras for emergencies – Because let’s be real, chocolate emergencies happen. Wrap individual bars tightly and freeze for up to 3 months.
- Undermix the brownie batter – Stir just until the flour disappears. Overmixing makes tough brownies, and we want fudgy perfection.
- Line your pan with parchment paper – Leave some overhang to lift the whole slab out later. No more wrestling with stuck-on edges.
One last confession – I’ve been known to hide a few bars behind the veggies in the fridge. Don’t judge until you’ve tasted them cold the next day – the flavors deepen overnight into something magical!
Ingredient Substitutions
Okay, let’s be real – sometimes you’re halfway through making these and realize you’re out of something. Or maybe you’re baking for someone with dietary needs. Don’t panic! I’ve tested plenty of swaps over the years, and these actually work without ruining the magic.
For the Brownie Layer
Out of all-purpose flour? You can use gluten-free 1:1 baking flour – I like King Arthur’s blend. The texture comes out nearly identical. Just make sure to whisk it extra well with the cocoa powder.
No cocoa powder? Melt 3 oz of unsweetened chocolate with the butter instead. The flavor will be richer, so you might want to reduce the sugar by 1/4 cup.
Butter alternatives? Coconut oil works in a pinch, but the brownies won’t be quite as rich. If using margarine, pick one with at least 80% fat content.
For the Cheesecake Layer
Don’t have cream cheese? Mascarpone makes an amazing (though pricier) substitute. The texture becomes extra luxurious. Just reduce the powdered sugar by 2 tablespoons since it’s sweeter.
Out of sour cream? Plain Greek yogurt works beautifully. I’ve even used buttermilk in emergencies – just add an extra tablespoon of powdered sugar to balance the tang.
Need dairy-free? Kite Hill makes a decent almond-based cream cheese alternative. The swirls won’t hold their shape as well, but the flavor still satisfies.
A word of caution – I’ve tried using applesauce instead of eggs (don’t ask), and let’s just say… some experiments are better left in the past. Stick to these tested swaps, and your brownie bars will still be irresistible!
Serving Suggestions
Now let’s talk about the best ways to enjoy these beauties – because while they’re absolutely perfect solo, sometimes you want to take them to the next level. Here are my favorite ways to serve them (usually depending on how fancy I’m feeling):
Still warm with vanilla ice cream – Okay, I know I said wait until they’re cool to cut, but if you absolutely can’t resist, scoop some melty vanilla ice cream on top. The contrast between warm fudgy brownie and cold creamy ice cream is unreal. Add a drizzle of caramel sauce if you’re feeling extra.
With fresh berries – The tartness of raspberries or strawberries cuts through the richness beautifully. I arrange them artfully on a platter when serving guests (and then eat them straight from the pan when no one’s looking).
Dusted with powdered sugar – For a simple but elegant touch, sift some powdered sugar over the top right before serving. Bonus points if you use a stencil for cute designs!
Alongside coffee or milk – My husband insists these are breakfast food when paired with black coffee (I don’t argue). For kids (or kids at heart), ice-cold milk is the perfect companion.
As part of a dessert board – Cut them into small squares and arrange with other treats like chocolate-covered pretzels and cookies. Watch them disappear faster than you can say “just one more!”
Honestly? They’re so good they don’t need any embellishment. But if you’re serving them to impress, any of these ideas will have people begging for your recipe!
Keeping Your Chocolate Cheesecake Brownie Bars Fresh
Let’s talk about the all-important question – how do you keep these decadent bars tasting their best? (And let’s be honest, how to hide them from sneaky snackers!) After countless batches, I’ve perfected my storage system.
Room temperature storage: If you’re planning to devour them within 2 days (no judgment!), just cover the pan tightly with foil or transfer to an airtight container. The cheesecake layer stays perfectly creamy at room temp for about 48 hours. Pro tip: Slide a piece of parchment between layers if stacking.
Refrigerator method: For longer storage, the fridge is your friend. Wrap individual bars in parchment first, then foil, or use an airtight container with parchment dividers. They’ll keep beautifully for up to 5 days this way. The cold actually intensifies the chocolate flavor – one of life’s little miracles!
Freezing for later: Yes, you can freeze these! I wrap each bar tightly in plastic wrap, then foil, and pop them in a freezer bag. They’ll stay perfect for up to 3 months. To serve, just thaw at room temperature for about an hour or pop in the microwave for 15 seconds if you can’t wait.
Reheating tips: While I love them cold, sometimes you want that fresh-from-the-oven experience. A 10-second microwave zap per bar works wonders. For a crowd, arrange them on a baking sheet and warm at 300°F for 5-7 minutes. The edges get slightly crisp while the centers stay gloriously gooey.
One last secret – I always stash a few in the back of the freezer for emergencies. Because nothing solves a bad day like a thawed chocolate cheesecake brownie bar with a tall glass of milk!
What You’re Really Eating With These Brownie Bars
Okay, let’s be real for a second – we’re not making these because they’re health food. But if you’re like me, you still want to know what you’re putting into your body (so you can decide if it’s worth the splurge – spoiler: it always is!). Here’s the nutritional lowdown per bar, based on my standard recipe:
- Calories: About 320 per bar (but who stops at one? Not me!)
- Fat: 18g – mostly from that glorious butter and cream cheese
- Sugar: 28g – it’s dessert, not a salad, people
- Protein: 4g – that counts as healthy, right?
Now, full disclosure: these numbers can vary based on the exact brands you use and how big you slice them (I won’t tell if you cut “extra large” portions). My friend swears her version comes out lighter when she uses a sugar substitute, but I think life’s too short to mess with perfection.
Here’s my philosophy: these chocolate cheesecake brownie bars are meant to be enjoyed as an occasional treat. One properly savored square with coffee after dinner beats mindlessly snacking on a whole bag of something “healthier” any day. Everything in moderation – including moderation!
Frequently Asked Questions
Can I freeze these brownie bars?
Absolutely! These freeze like a dream. Just wrap individual bars tightly in plastic wrap, then foil, and pop them in a freezer bag. They’ll stay perfect for up to 3 months. When the craving hits, thaw at room temperature for about an hour or microwave for 15 seconds if you’re impatient like me.
How do I prevent cracks in the cheesecake layer?
The secret is patience (I know, not my strong suit either). Don’t overmix the cheesecake batter – beat just until smooth. And always let the bars cool gradually in the turned-off oven with the door slightly ajar for about 10 minutes before moving them to the counter. Sudden temperature changes cause most cracks.
Can I make these gluten-free?
You bet! I’ve had great success using a 1:1 gluten-free flour blend instead of regular flour. Just make sure to whisk it extra well with the cocoa powder to avoid any grittiness. The texture comes out nearly identical – my gluten-free friends couldn’t tell the difference!
Why did my swirls disappear during baking?
Ah, the classic swirl mystery! This usually happens if you swirl too much or the cheesecake layer is too thin. Next time, make sure your cheesecake layer is thick enough (about 1/2 inch dollops) and only make 4-5 gentle passes with the knife. Less is more when it comes to swirling!
How do I know when they’re done baking?
The edges should look set, and a toothpick inserted about 1 inch from the edge should come out with moist crumbs (not wet batter). The center will still look slightly jiggly – that’s perfect! Remember, they’ll continue cooking as they cool. Overbaking leads to dry brownies, and we can’t have that.
If you’re looking for more dessert inspiration, check out my dessert ideas!
Print
“20 Irresistible Chocolate Cheesecake Brownie Bars You’ll Crave”
- Total Time: 50 minutes
- Yield: 12 bars 1x
- Diet: Vegetarian
Description
Rich and decadent chocolate cheesecake brownie bars combine fudgy brownies with creamy cheesecake for a perfect dessert.
Ingredients
- 1 cup all-purpose flour
- 1/2 cup cocoa powder
- 1/2 teaspoon salt
- 1 cup unsalted butter, melted
- 2 cups granulated sugar
- 4 large eggs
- 1 teaspoon vanilla extract
- 8 oz cream cheese, softened
- 1/4 cup sour cream
- 1/2 cup powdered sugar
Instructions
- Preheat your oven to 350°F (175°C). Grease a 9×13-inch baking pan.
- In a bowl, whisk flour, cocoa powder, and salt. Set aside.
- Mix melted butter and granulated sugar. Add eggs one at a time, then vanilla.
- Fold dry ingredients into the wet mixture until combined. Spread batter into the pan.
- Beat cream cheese, sour cream, and powdered sugar until smooth. Drop spoonfuls over brownie batter.
- Swirl with a knife. Bake for 30-35 minutes. Cool completely before cutting.
Notes
- Use room-temperature cream cheese for smoother mixing.
- Let brownies cool before slicing for cleaner edges.
- Store in an airtight container for up to 3 days.
- Prep Time: 15 minutes
- Cook Time: 35 minutes
- Category: Dessert
- Method: Baking
- Cuisine: American
Nutrition
- Serving Size: 1 bar
- Calories: 320
- Sugar: 28g
- Sodium: 120mg
- Fat: 18g
- Saturated Fat: 10g
- Unsaturated Fat: 6g
- Trans Fat: 0g
- Carbohydrates: 38g
- Fiber: 2g
- Protein: 4g
- Cholesterol: 90mg


