
There’s something magical about homemade chocolates on Valentine’s Day – and these Passion Kiss Chocolates? Oh, they’re in a league of their own! I still remember the first time I made them for my sweetheart, watching their face light up as they bit into that rich, velvety dark chocolate with just a hint of raspberry surprise. These aren’t your average boxed chocolates – they’re little edible love notes, each one crafted with attention and care. Whether you’re celebrating with your forever valentine or treating yourself (because you deserve it!), these decadent bites will make your heart flutter. Trust me, once you try making them, you’ll understand why they’ve become my Valentine’s Day tradition!
Why You’ll Love These Valentine’s Day Passion Kiss Chocolates
Oh, where do I even start with these little love bombs? First off, they’re ridiculously easy to make—no fancy skills required, just a little patience (and maybe a few chocolate-covered fingers along the way). Here’s why they’ll steal your heart:
- Rich, dreamy flavor: That mix of dark, milk, and white chocolate? Pure magic. The dark chocolate gives it depth, the milk keeps it smooth, and the white adds a sweet little surprise.
- Endlessly customizable: Swap the raspberry jam for orange zest, sea salt, or even a splash of liqueur. Make them *yours*.
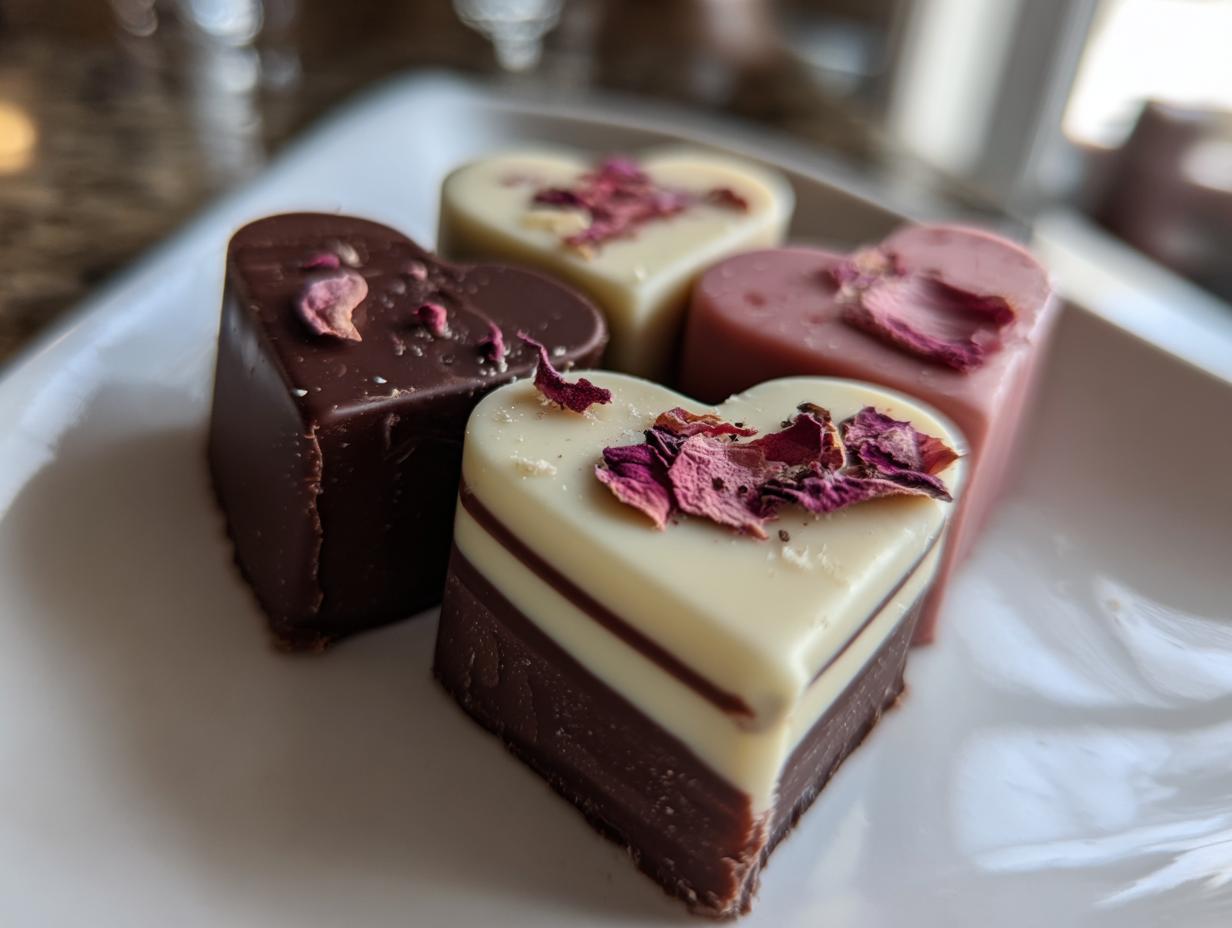
- Romantic as heck: Heart-shaped, rose-petal garnished… need I say more? They’re basically edible poetry.
- The homemade touch: Nothing says “I love you” like something made by hand. Wrap them in pretty paper, and boom—instant swoon-worthy gift.
Seriously, these chocolates are like a hug in dessert form. Once you try them, store-bought just won’t cut it.
Valentine’s Day Passion Kiss Chocolates Ingredients
Alright, let’s gather our love potion ingredients! Here’s everything you’ll need to whip up these dreamy chocolates:
- 200g dark chocolate (70% cocoa), chopped – The richer, the better. This is the soul of our chocolates!
- 100g milk chocolate, chopped – For that creamy, melt-in-your-mouth magic.
- 50g white chocolate, chopped – A sweet little contrast to balance the dark.
- 1 tsp vanilla extract – Just a whisper to round out the flavors.
- 1 tbsp unsalted butter – Because everything’s better with butter.
- 1/4 cup heavy cream, warmed – The secret to that silky-smooth ganache.
- 1/4 cup raspberry jam (optional filling) – A tangy surprise hiding inside? Yes, please!
- Edible rose petals for garnish (optional) – Because we’re extra like that.
Ingredient Notes & Substitutions
Don’t skimp on the chocolate—high quality means *no* waxy aftertaste. Heavy cream is non-negotiable for that luscious texture, but coconut cream works beautifully for a dairy-free version. Vegan? Swap in dairy-free chocolate and butter. Not a raspberry fan? Try passionfruit curd or a sprinkle of sea salt instead. The world (or at least your chocolate) is your oyster!
Equipment You’ll Need for Valentine’s Day Passion Kiss Chocolates
Don’t worry—you won’t need any fancy gadgets for these beauties! Just grab these trusty tools from your kitchen:
- Heart-shaped silicone molds – The cuter, the better! (But any small mold works in a pinch.)
- Double boiler or heatproof bowl + saucepan – For melting chocolate without scorching it. No double boiler? A metal bowl over simmering water works wonders.
- Small saucepan – Just for warming that cream and butter.
- Sharp knife and cutting board – For chopping chocolate into even little pieces.
- Silicone spatula – Your best friend for smoothing chocolate into molds.
- Measuring cups and spoons – Precision matters when you’re crafting love potions!
- Small spoon or piping bag – For adding those raspberry jam surprises.
That’s it! No fancy chocolate thermometers or special equipment—just everyday tools to create something extraordinary.
How to Make Valentine’s Day Passion Kiss Chocolates
Okay, lovebirds, let’s get to the fun part! Making these chocolates is easier than you think—just follow these simple steps, and you’ll have edible romance in no time.
Preparing the Chocolate
First things first: chop all your chocolates into small, even pieces—this helps them melt evenly without clumps. Trust me, I’ve learned the hard way that big chunks just won’t cooperate! Then, heat your heavy cream and butter in a small saucepan until it’s just starting to simmer (little bubbles at the edges). Pour the hot cream over the dark chocolate in a heatproof bowl, let it sit for a minute (patience, my sweet!), then stir gently until it’s smooth as silk. Repeat with the milk and white chocolates in separate bowls. And whatever you do, don’t overheat the chocolate—no one wants grainy, burnt-tasting love potions!
Layering and Filling
Now for the artistic part! Spoon the dark chocolate into your heart molds, filling them about halfway. Then, take tiny dollops of raspberry jam (if using) and drop them randomly into each mold—these little surprises make every bite exciting! Next, alternate between milk and white chocolate to fill the molds the rest of the way. I like to swirl them slightly with a toothpick for a marbled effect. Gently tap the molds on the counter to release any sneaky air bubbles—this step is crucial for picture-perfect chocolates!
Setting and Garnishing
Pop those beauties in the fridge for at least 2 hours—I know, waiting is the hardest part! But resist the urge to peek too often. Once they’re fully set, carefully pop them out of the molds. If they resist, let them sit at room temperature for a minute—they’ll loosen right up. For that final romantic touch, sprinkle on some edible rose petals or a dusting of cocoa powder while the chocolate is still slightly tacky. And voilà! You’ve just created little edible love letters that’ll make anyone weak in the knees.
Tips for Perfect Valentine’s Day Passion Kiss Chocolates
After making these chocolates more times than I can count (and eating plenty of “test batches”), I’ve picked up some foolproof tricks to make yours absolutely flawless:
- Room-temperature molds are your friend: Cold molds can make the chocolate set too fast and crack. Let them sit out for 10 minutes before filling—your future smooth chocolates will thank you!
- Tap, tap, tap those bubbles away: After filling the molds, give them a few firm taps on the counter. Those sneaky air bubbles love to hide and ruin your pretty designs.
- Chop chocolate evenly: Uneven pieces melt at different rates. Take the extra minute to chop everything small and uniform—it makes all the difference in that velvety texture.
- Work fast but don’t rush: Chocolate waits for no one! Have all your ingredients measured and ready before you start melting. But don’t panic—smooth motions prevent messy spills (speaking from experience here).
- Garnish while slightly sticky: Add rose petals or sprinkles right after unmolding, when the surface is just tacky enough to make them stick beautifully.
Remember, even “imperfect” homemade chocolates taste amazing—so don’t stress! The love you put into them is the real secret ingredient.
Storing and Gifting Valentine’s Day Passion Kiss Chocolates
These little love bites stay fresh for up to 2 weeks when stored properly—just keep them in an airtight container in the fridge (trust me, they’ll disappear long before then!). For gifting, I love wrapping them in pretty parchment paper tied with ribbon, or tucking them into small decorative boxes lined with tissue paper. Pro tip: Add a handwritten note tucked underneath—it’s those personal touches that make homemade gifts extra special!
Valentine’s Day Passion Kiss Chocolates FAQs
Over the years, I’ve gotten all sorts of questions about these dreamy chocolates – and hey, no judgment here! We all start somewhere. Here are the answers to the ones I hear most often:
Can I use just milk chocolate instead of the three types?
Absolutely! While I adore the flavor symphony of all three chocolates, pure milk chocolate works beautifully if that’s your sweetheart’s favorite. Just keep an eye on the texture – milk chocolate sets a bit softer, so you might need an extra chill hour.
How far in advance can I make these for Valentine’s Day?
Oh, they’re perfect for prepping ahead! Make them up to 3 days before and store in the fridge in an airtight container. The flavors actually deepen and get even better after a day. Just wait to garnish until you’re ready to serve for maximum freshness.
Help! My chocolate seized up – can I fix it?
Been there, done that! If your chocolate gets grainy, don’t panic. Quickly stir in a teaspoon of vegetable oil or warm cream until smooth again. And next time, make sure no water gets into your melting chocolate – even a tiny drop can cause this. (I learned this the messy way!)
Are there nut-free filling options besides jam?
Definitely! Try marshmallow fluff, caramel, or even just layering different chocolate colors for a stunning effect. My friend swears by tiny pieces of dried strawberry – gives a similar tartness to the raspberry without any allergens.
Can kids help make these?
Heck yes! Little hands are great at sprinkling garnishes and (carefully) spooning chocolate into molds. Just keep them away from the hot pans – that’s adult territory. Some of my best Valentine’s memories are chocolate-covered kiddo giggles in the kitchen!
Nutritional Information
Now, let’s be real – we’re not making these chocolates because they’re health food! But since you might be curious (or counting those sweet indulgences), here’s the scoop: Each chocolate is a rich little package of love, with the exact nutrition depending on your specific ingredients and how big you make them.
Using dark chocolate bumps up the antioxidants (yay!), while the milk and white chocolates bring that creamy sweetness we all adore. The raspberry jam adds a touch of fruitiness, and the butter and cream create that melt-in-your-mouth texture we can’t resist.
Remember, these are treats meant to be savored slowly – one decadent bite at a time. The numbers might vary based on your chocolate brand or whether you go heavy on the garnishes (no judgment here!). The most important ingredient? The love you put into making them – and that’s calorie-free!
Share Your Valentine’s Day Passion Kiss Chocolates
I’d love to see your chocolatey creations! Snap a pic of your Passion Kiss Chocolates and tag me—I’ll be your biggest cheerleader. Did you try a fun twist? Found the perfect garnish? Drop a comment below or share on social media. Nothing makes me happier than seeing your edible love stories come to life!
Print
3-Ingredient Valentine’s Day Passion Kiss Chocolates – Irresistible!
- Total Time: 2 hours 30 minutes
- Yield: 12 chocolates 1x
- Diet: Vegetarian
Description
Decadent chocolates perfect for Valentine’s Day, designed to spark passion and romance.
Ingredients
- 200g dark chocolate (70% cocoa)
- 100g milk chocolate
- 50g white chocolate
- 1 tsp vanilla extract
- 1 tbsp unsalted butter
- 1/4 cup heavy cream
- 1/4 cup raspberry jam (optional filling)
- Edible rose petals for garnish (optional)
Instructions
- Chop all chocolates into small pieces and place in separate bowls.
- Heat heavy cream and butter in a saucepan until just simmering.
- Pour hot cream over dark chocolate, let sit for 1 minute, then stir until smooth.
- Repeat with milk and white chocolates in separate bowls.
- Add vanilla extract to dark chocolate mixture.
- Pour dark chocolate into heart-shaped molds, filling halfway.
- Add small dollops of raspberry jam if using.
- Top with remaining chocolate mixtures, alternating colors.
- Tap molds gently to remove air bubbles.
- Chill in refrigerator for 2 hours until set.
- Garnish with edible rose petals before serving.
Notes
- Use high-quality chocolate for best results.
- Work quickly when tempering chocolate.
- Can be made 3 days ahead if stored properly.
- For vegan version, use coconut cream and dairy-free chocolate.
- Prep Time: 20 minutes
- Cook Time: 10 minutes
- Category: Dessert
- Method: No-Bake
- Cuisine: International
Nutrition
- Serving Size: 1 chocolate
- Calories: 120
- Sugar: 8g
- Sodium: 5mg
- Fat: 7g
- Saturated Fat: 4g
- Unsaturated Fat: 2g
- Trans Fat: 0g
- Carbohydrates: 12g
- Fiber: 1g
- Protein: 1g
- Cholesterol: 5mg


