
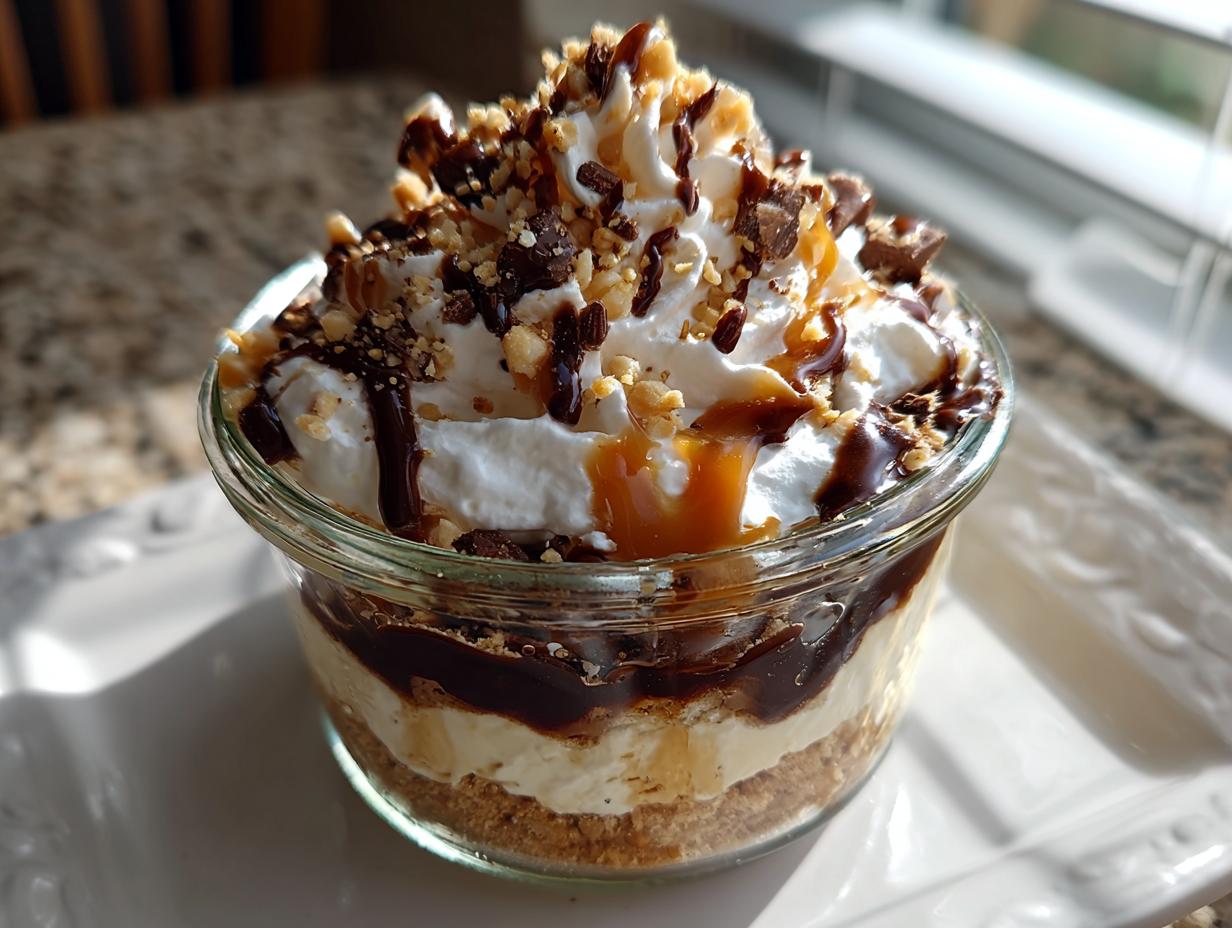
You know those crazy TikTok dessert trends that look too good to be true? Well, I’ve been testing no-bake recipes in my kitchen for years, and these Snickers cheesecake jars actually live up to the hype! Imagine all the flavors you love in a Snickers bar – creamy caramel, rich chocolate, crunchy peanuts – layered with the smoothest no-bake cheesecake filling in cute little jars. The best part? You don’t even need to turn on your oven. I’ve made these dozens of times for parties (and okay, sometimes just for myself), and they disappear faster than you can say “peanut butter cup”. Perfect for when you need an impressive dessert but don’t want to spend hours in the kitchen!
Why You’ll Love These Viral No-Bake Snickers Cheesecake Jars
Trust me, this recipe is about to become your new go-to dessert for so many reasons:
- No oven needed – Perfect for hot summer days when baking sounds like torture
- Ready in 15 minutes (plus chilling) – Faster than running to the store!
- Individual servings – No messy slicing, just grab and go
- Party-perfect – These cute jars will have everyone reaching for their phones to snap pics
- Snickers magic – That perfect salty-sweet combo we all crave
I’m not exaggerating when I say these disappear every single time I make them. My friends actually request them now!
Ingredients for Viral No-Bake Snickers Cheesecake Jars
Here’s everything you’ll need to make these irresistible treats – and yes, the quality of ingredients totally matters! I’ve learned through trial and error that these exact measurements create the perfect balance:
- 1 cup graham cracker crumbs (about 9 full sheets, crushed fine but not powdery)
- 3 tbsp melted butter (salted works best for that sweet-salty punch)
- 8 oz cream cheese, softened (leave it out for 30 minutes – this is crucial!)
- 1/4 cup powdered sugar (sifted to avoid lumps)
- 1 tsp vanilla extract (the real stuff, please!)
- 1/2 cup caramel sauce (I prefer thick, spoonable sauce over runny varieties)
- 1/2 cup chocolate sauce (the good fudge kind that drizzles nicely)
- 1/2 cup chopped peanuts (I like mine roughly chopped for extra crunch)
- 1/2 cup whipped cream (freshly whipped or quality canned works too)
Pro tip: Have all ingredients measured and ready before you start – it makes the layering process so much smoother!
Equipment You’ll Need
Don’t worry – you probably already have most of this stuff in your kitchen! Here’s what I grab every time I make these cheesecake jars:
- 4 airtight jars (8-oz mason jars are perfect)
- Mixing bowls (one small, one medium)
- Electric mixer (or strong arm muscles for hand mixing)
- Measuring cups and spoons
- Spatula (for scraping every last bit of that delicious filling)
- Spoon or small scoop (for neat layering)
That’s it! No fancy gadgets required – just simple tools for seriously delicious results.
How to Make Viral No-Bake Snickers Cheesecake Jars
Okay, let’s get to the fun part – making these irresistible treats! Don’t worry if you’re not a pro baker – I’ve broken it down into simple steps anyone can follow. Just take your time with the layering, and you’ll have picture-perfect jars every time!
Step 1: Prepare the Crust
First, grab those graham cracker crumbs and melted butter. Mix them together in a small bowl until they look like wet sand – you want every crumb coated. Now, divide this mixture evenly between your jars (about 2 tablespoons per jar). Press it down firmly with the back of a spoon to create a nice, even base. Pro tip: Chill the jars for 10 minutes after this step to help the crust set before adding the filling!
Step 2: Make the Cheesecake Filling
Here’s where the magic happens! Beat your softened cream cheese in a medium bowl until it’s completely smooth – no lumps allowed! Add the powdered sugar and vanilla, then keep mixing until everything is well combined and creamy. If your mixture looks grainy, just keep beating – it’ll come together, I promise! The filling should be thick but spreadable, like frosting.
Step 3: Layer the Ingredients
Now for the fun part – building those beautiful layers! Start with about 2 tablespoons of cheesecake filling in each jar, smoothing it gently over the crust. Next comes caramel sauce (about 1 tablespoon), then sprinkle with chopped peanuts. Repeat with another layer of cheesecake filling, then chocolate sauce, and more peanuts. The key is to work slowly and neatly – I like using a small spoon or piping bag for the cheesecake layers to keep things tidy!
Step 4: Chill and Serve
Pop those gorgeous jars in the fridge for at least 2 hours (though overnight is even better!). When you’re ready to serve, top each with a dollop of whipped cream and an extra drizzle of caramel and chocolate. Trust me, the wait is worth it – the flavors meld together perfectly while chilling, and the texture becomes dreamily creamy!
Tips for Perfect Viral No-Bake Snickers Cheesecake Jars
After making these cheesecake jars more times than I can count, I’ve picked up some game-changing tricks that’ll guarantee perfect results every time:
- Room temp cream cheese is non-negotiable – Cold cream cheese will leave you with lumpy filling, no matter how long you mix
- Use squeeze bottles for sauces – This gives you perfect drizzle control and keeps your layers picture-perfect
- Chill your jars beforehand – A quick 10 minutes in the freezer helps set the crust faster
- Tap jars lightly between layers – This settles everything neatly without mixing the layers
- Want clean sides? Wipe the jar interior with a paper towel after each layer
Little details make a big difference – your Instagram feed will thank you!
Ingredient Substitutions & Variations
Listen, I’m all about sticking to the original recipe (it’s perfect as-is!), but sometimes you’ve gotta improvise based on what’s in your pantry or dietary needs. Here are my favorite tweaks that still deliver amazing results:
- No caramel? Try almond butter or even dulce de leche – just warm it slightly for easier drizzling
- Peanut allergies? Toasted pecans or almonds make a fantastic crunchy substitute
- Dairy-free? Use vegan cream cheese and coconut whipped cream – the texture will be slightly softer but still delicious
- Extra chocolatey? Mix cocoa powder into the cheesecake filling – start with 2 tablespoons
- Gluten-free? Crushed gluten-free cookies work great instead of graham crackers
Just remember – the more substitutions you make, the more the texture might change. But hey, that’s part of the fun of creating your own signature version!
Serving and Storage Suggestions
These cheesecake jars are best served chilled straight from the fridge – trust me, the flavors pop when they’re cold! Keep the lids on tight if storing (they’ll last up to 3 days in the fridge). Heads up – don’t freeze them or the texture gets weird. Pro tip: Add fresh whipped cream right before serving for that perfect Instagram-worthy finish!
Nutritional Information
Just a heads up – these numbers are estimates since brands and exact measurements can vary. But here’s the breakdown per jar (you know, in case you’re curious between bites!):
- Calories: 420
- Fat: 28g
- Sugar: 32g
- Protein: 6g
Yeah, it’s definitely a treat – but totally worth every delicious bite! Everything in moderation, right?
Frequently Asked Questions
Q1. Can I use store-bought caramel and chocolate sauces?
Absolutely! I’ve tested this recipe with both homemade and store-bought sauces, and they work great. Just look for thicker varieties that will hold their shape in layers – the squeeze bottle kind works perfectly!
Q2. How long can these cheesecake jars sit out at a party?
They’ll be fine for about 2 hours at room temperature, but any longer and they’ll start to soften too much. I recommend keeping them chilled until right before serving – they taste best cold anyway!
Q3. Can I make these ahead of time?
Yes! These actually taste even better after chilling overnight. Just wait to add the whipped cream topping until right before serving so it stays fresh and fluffy.
Q4. What size jars work best?
I use 8-ounce mason jars – they’re the perfect single-serving size. If you use smaller jars, you’ll have extra filling (not necessarily a bad problem to have!).
Q5. Can I double this recipe?
Of course! This recipe scales up beautifully. Just make sure you have enough jars ready – these disappear fast whenever I make them for gatherings!
Final Thoughts
I can’t wait for you to try these Snickers cheesecake jars – they’re seriously foolproof and always impress! Tag me when you make them (I love seeing your creations!), and don’t be surprised when everyone asks for the recipe. Trust me, these little jars of joy are about to become your new dessert obsession!
Print
15-Minute Viral No-Bake Snickers Cheesecake Jars You’ll Crave
- Total Time: 2 hours 15 mins
- Yield: 4 jars 1x
- Diet: Vegetarian
Description
A quick and easy no-bake dessert inspired by Snickers bars, served in individual jars for a fun presentation.
Ingredients
- 1 cup graham cracker crumbs
- 3 tbsp melted butter
- 8 oz cream cheese, softened
- 1/4 cup powdered sugar
- 1 tsp vanilla extract
- 1/2 cup caramel sauce
- 1/2 cup chocolate sauce
- 1/2 cup chopped peanuts
- 1/2 cup whipped cream
Instructions
- Mix graham cracker crumbs with melted butter. Press into the bottom of jars.
- Beat cream cheese, powdered sugar, and vanilla until smooth.
- Layer cream cheese mixture, caramel sauce, chocolate sauce, and peanuts in jars.
- Top with whipped cream and extra drizzle of caramel and chocolate.
- Chill for at least 2 hours before serving.
Notes
- Use airtight jars for storage.
- Can be made a day ahead.
- Substitute peanuts with almonds for variation.
- Prep Time: 15 mins
- Cook Time: 0 mins
- Category: Dessert
- Method: No-Bake
- Cuisine: American
Nutrition
- Serving Size: 1 jar
- Calories: 420
- Sugar: 32g
- Sodium: 280mg
- Fat: 28g
- Saturated Fat: 14g
- Unsaturated Fat: 10g
- Trans Fat: 0g
- Carbohydrates: 38g
- Fiber: 2g
- Protein: 6g
- Cholesterol: 55mg


