
I still remember my first bite of a *real* Black Forest cupcake from that little German bakery downtown. The rich chocolate, tart cherries, and cloud-like whipped cream made me weak in the knees—and I’ve been obsessed with recreating that magic at home ever since. Good news? My Bakery Copycat Black Forest Cupcakes taste just as indulgent but are shockingly easy to make. No fancy skills needed—just layers of moist chocolate cake, gooey cherry filling, and billowy whipped cream. Trust me, one bite and you’ll swear these came from a patisserie case!
Why You’ll Love Bakery Copycat Black Forest Cupcakes
These cupcakes are pure magic, and here’s why:
- Restaurant-quality taste at home – That perfect balance of rich chocolate, tart cherries, and silky cream you’d pay top dollar for
- Foolproof method – No fancy techniques, just simple steps anyone can follow
- Showstopper presentation – The whipped cream swirls and chocolate shavings make them look straight from a bakery case
- Customizable sweetness – Adjust the cherry filling or whipped cream to your perfect level of decadence
- Quick to make – From bowl to table in under an hour (though they never last that long!)
Ingredients for Bakery Copycat Black Forest Cupcakes
Gathering the right ingredients is half the battle with these cupcakes – and trust me, every single one plays a crucial role in that perfect bakery-style taste. I’ve tweaked these amounts over countless batches to get them just right. Pro tip: Measure everything before you start (my grandma called this “mise en place” and it saves so much stress!)
For the chocolate cupcakes:
- 1 1/2 cups all-purpose flour – spooned and leveled, please don’t scoop from the bag!
- 1/3 cup cocoa powder – the good stuff, not the baking aisle bargain brand
- 1 teaspoon baking soda – make sure it’s fresh (test it with vinegar if unsure)
- 1/2 teaspoon salt – just a pinch to balance all that sweetness
- 1 cup granulated sugar – yes, the full cup, we’re making dessert here
- 1/2 cup vegetable oil – this keeps them insanely moist for days
- 1 large egg – room temperature (leave it out for 30 minutes first)
- 1 teaspoon pure vanilla extract – imitation just won’t do it justice
- 1 cup buttermilk – room temp (no buttermilk? See my quick fix in variations!)
For the glorious filling and topping:
- 1 can (21 oz) cherry pie filling – the good kind with plump cherries, not just sauce
- 1 cup heavy cream – must be heavy cream, half-and-half will disappoint
- 2 tablespoons powdered sugar – sifted if you’re feeling fancy
- Dark chocolate bar – for shaving (a vegetable peeler works miracles here)
See? Nothing too crazy! Just quality ingredients treated right. Oh, and don’t even think about skipping the chocolate shavings – they’re not just pretty, they add that essential bitter contrast to balance all the sweet.
Equipment Needed
Now let’s talk tools—because while these cupcakes taste fancy, you don’t need a pastry chef’s kitchen to make them. Over the years, I’ve discovered these 5 essentials give me bakery-perfect results every single time:
- 12-cup muffin tin – Nonstick is great, but paper liners do the trick too (use the tulip-style ones for extra drama)
- Electric hand mixer or stand mixer – For that dreamy whipped cream topping (though a determined whisk and strong arms can work in a pinch!)
- Piping bag with star tip – A simple plastic bag with the corner snipped works if you’re in a bind
- Small cookie scoop or melon baller – My secret for neat cherry filling holes without mangling the cupcakes
- Vegetable peeler or grater – For those beautiful chocolate curls that make everyone go “wow”
That’s it! No fancy gadgets required—just the basics most bakers already have. Though I will confess… once you taste these, you might start eyeing that cherry pitter you swore you’d never need. (Don’t say I didn’t warn you!)
How to Make Bakery Copycat Black Forest Cupcakes
Okay, let’s get to the fun part—bringing these beauties to life! I promise it’s easier than it looks. Just follow these steps, and you’ll have cupcakes that’ll make your friends think you secretly trained in a German bakery.
Prepare the Chocolate Cupcake Batter
First things first—preheat that oven to 350°F (175°C). While it’s heating up, let’s make magic happen in your mixing bowl. Grab your dry ingredients (flour, cocoa powder, baking soda, salt) and whisk them together like you mean it. No lumps allowed!
In another bowl, mix the sugar and oil until they’re best friends. Crack in that room-temperature egg (cold eggs are the enemy of smooth batter!) and vanilla, then beat until it’s all smooth and slightly fluffy. Now comes the secret: alternate adding your dry mix and buttermilk in three additions, starting and ending with dry. Mix just until combined—overmixing is the quickest way to tough cupcakes. The batter will be thick but pourable, like a perfect chocolatey cloud.
Bake and Cool the Cupcakes
Line your muffin tin with those pretty cupcake liners (I’m partial to the red ones for these—so festive!). Fill each about 2/3 full—an ice cream scoop makes this mess-free. Pop them in the oven for 18-20 minutes. You’ll know they’re done when a toothpick comes out with just a few moist crumbs (not wet batter!).
Here’s where patience comes in: let them cool in the pan for 5 minutes, then transfer to a wire rack. Trying to fill or frost warm cupcakes is a recipe for disaster—trust me, I’ve learned this the hard way with many a melted whipped cream tragedy!
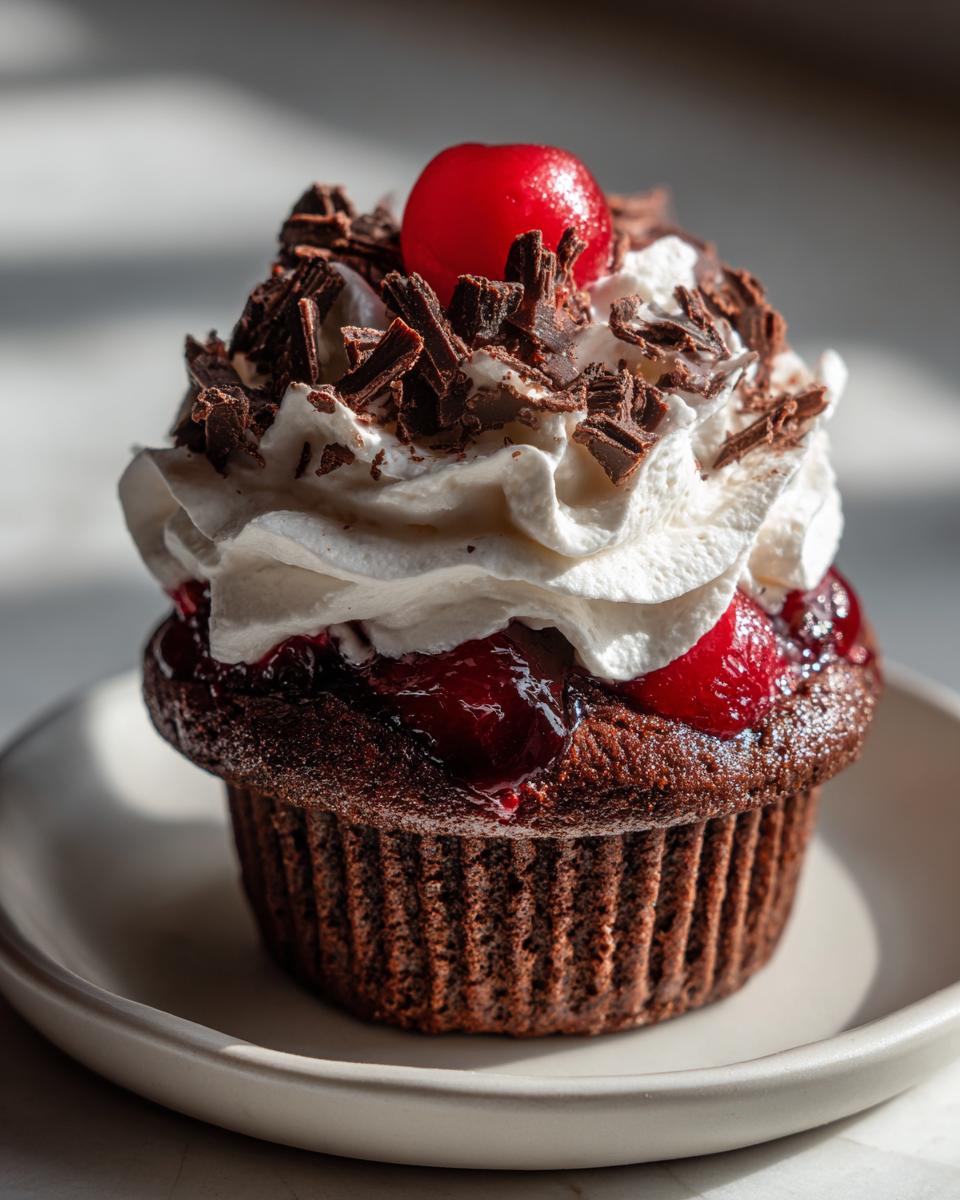
Fill with Cherry Pie Filling
Once completely cool, it’s time for the cherry surprise inside! Take a small spoon or melon baller and gently scoop out a little divot from the top center of each cupcake—about the size of a cherry (pun intended). Don’t go all the way to the bottom! Fill each hole with about a tablespoon of that glorious cherry pie filling. Pro tip: use a piping bag for the filling if you want super neat results—it’s less messy than spooning.
Top with Whipped Cream and Garnish
Now for the crowning glory! Chill your mixing bowl and beaters for 10 minutes (this makes all the difference). Whip the heavy cream and powdered sugar on medium-high until stiff peaks form—when you lift the beaters, the cream should stand straight up without flopping over. Be careful not to over-whip or you’ll get butter (again… learned that the hard way).
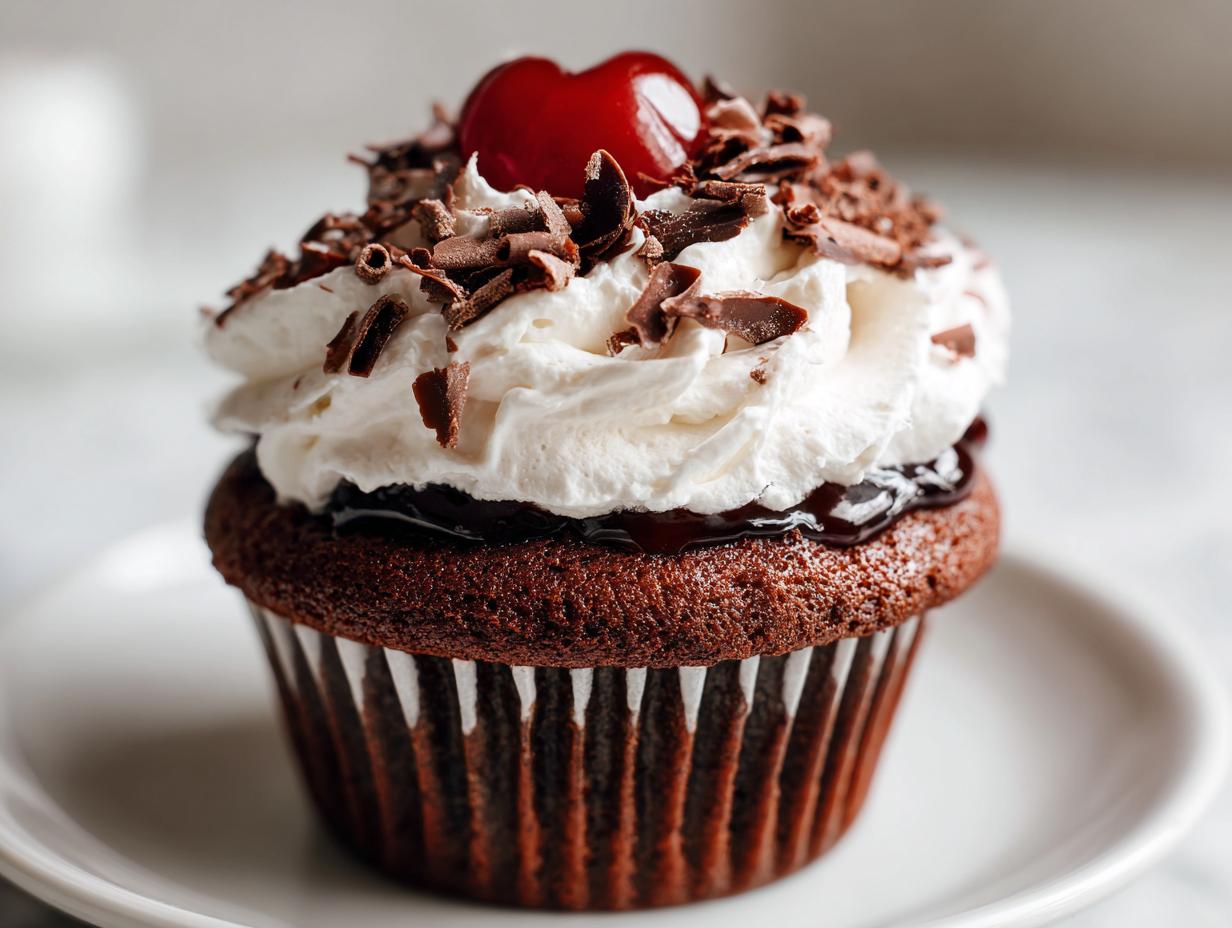
Pipe generous swirls onto each cupcake using a star tip—or just dollop it on with a spoon for that rustic charm. Finally, take your vegetable peeler to that chocolate bar and shower each cupcake with delicate curls. The contrast of dark chocolate against white cream is just *chef’s kiss* perfection!
And there you have it—bakery-worthy Black Forest cupcakes that’ll have everyone begging for your secret. Just try not to eat all the chocolate shavings before they make it onto the cupcakes… I won’t judge if you do!
Tips for Perfect Bakery Copycat Black Forest Cupcakes
After making these cupcakes more times than I can count (oh, the sacrifices we make for perfection!), I’ve picked up some game-changing tricks that take them from good to “is this really homemade?!” status. These are the little details that make all the difference:
Chill everything for the whipped cream
I can’t stress this enough – cold is your friend when making whipped cream! Pop your mixing bowl and beaters in the freezer for 10 minutes before starting. Even better? Keep your heavy cream in the fridge until the very last second. Warm cream just won’t whip up properly, leaving you with a sad, soupy mess instead of those glorious stiff peaks we’re after.
Don’t skimp on the cocoa powder
That grocery store generic cocoa? Save it for hot chocolate. For these cupcakes, splurge on the good stuff – I’m talking Dutch-process or at least a premium brand. The deeper, richer flavor makes all the difference. My personal favorite is Valrhona, but any high-quality cocoa will elevate your cupcakes from “nice” to “where did you buy these?”
Freshness matters for leaveners
That baking soda sitting in your pantry since last Christmas? Toss it. Old leaveners lose their oomph, leaving you with dense cupcakes that could double as hockey pucks. Test your baking soda by mixing a pinch with vinegar – if it doesn’t bubble like crazy, it’s time for a new box.
The refrigerator is your friend
These beauties must be stored in the fridge because of the whipped cream topping (food safety first!). But here’s a pro tip: let them sit at room temp for about 10 minutes before serving. The flavors bloom beautifully when they’re not ice-cold. Oh, and if you need to store them overnight, wait to add the whipped cream and chocolate shavings until right before serving to keep everything fresh and pretty.
Patience with cooling pays off
I know it’s tempting to frost them while warm, but resist! Filling warm cupcakes leads to soggy bottoms, and warm cupcakes will melt your beautiful whipped cream into a sad puddle. Wait until they’re completely cool – about an hour – for picture-perfect results every time.
Follow these tips, and I promise your Black Forest cupcakes will rival any fancy bakery’s version. Now go forth and bake – and don’t forget to lick the whipped cream bowl when you’re done!
Variations and Substitutions
Listen, I’m all about sticking to the original recipe (it’s perfect as-is!), but sometimes you’ve gotta improvise. Here are my tried-and-true swaps that still deliver that bakery-quality taste when you’re in a pinch:
Buttermilk alternatives that work
No buttermilk? No problem! My go-to fix is mixing 1 cup regular milk with 1 tablespoon lemon juice or vinegar – let it sit for 5 minutes until it gets slightly curdled. Greek yogurt thinned with a splash of milk works beautifully too. Sour cream? You bet – just thin it down to buttermilk consistency.
Fresh cherries vs canned filling
If you’re feeling fancy, swap the pie filling for fresh cherries. Pit about 2 cups, simmer with 1/4 cup sugar and 1 tablespoon cornstarch until thickened. Want it boozy? Add a splash of kirsch (authentic Black Forest style!) or brandy. Just promise me you’ll let it cool before filling those cupcakes.
Whipped cream woes? Try this
If heavy cream isn’t an option, stabilized whipped cream using mascarpone holds up better for parties. Mix 4 oz mascarpone with 1 cup cold cream and 2 tbsp sugar. For a non-dairy version, coconut cream works in a pinch (just expect a slight coconut flavor).
Flour swaps for dietary needs
Need gluten-free? Use a 1:1 GF flour blend (I like King Arthur’s). For whole wheat, replace half the flour – any more and your cupcakes get dense. Almond flour? Sorry friend, that’s a whole different recipe.
Remember: every substitution changes the final product a bit. My rule? Only swap one ingredient at a time until you know how it behaves. Now go play with your food – that’s half the fun of baking!
Serving and Storage for Bakery Copycat Black Forest Cupcakes
Alright, let’s talk about keeping these beauties fresh and fabulous! Unlike regular cupcakes, these need a little extra TLC because of that dreamy whipped cream topping. Here’s everything I’ve learned through trial and (many) errors:
How to store them properly
Straight in the fridge they go! The whipped cream demands it. I like to arrange them in a single layer in an airtight container – if you stack them, you’ll end up with squished cream tops (ask me how I know). No container big enough? Just cover the cupcake tray tightly with plastic wrap. They’ll keep beautifully for 2-3 days this way.
The perfect serving temperature
Here’s the thing – straight-from-the-fridge cupcakes can taste a bit muted. About 10-15 minutes before serving, I pull them out to let the flavors wake up. The chocolate becomes more fragrant, the cherry filling gets juicier, and the whipped cream softens just enough. But don’t leave them out too long – especially in warm weather – or that cream will start to slump.
Why freezing is a no-go
I made this mistake exactly once. Whipped cream freezes into weird icy crystals that weep when thawed. The cherry filling turns the cake soggy. Just… don’t. If you must prep ahead, freeze just the unfrosted cupcakes, then fill and top them the day you serve. Even then, they’re best fresh – the moist texture suffers after freezing.
Make-ahead magic
Want to get a jumpstart? Bake the cupcakes a day ahead and store them unfrosted at room temp in an airtight container. The cherry filling can be refrigerated separately. Day-of, just assemble with freshly whipped cream. I often do this for parties – nobody will guess you didn’t slave away all morning!
Remember, these cupcakes are at their absolute best within 24 hours. After that, the cake starts to dry out a bit despite the cherry filling’s moisture. But let’s be real – they rarely last that long in my house anyway!
Nutritional Information
Now, let’s be real – we’re not eating Black Forest cupcakes for their health benefits! But since folks always ask, here’s the general breakdown (with my baker’s disclaimer: these are estimates that’ll vary based on your exact ingredients and portion sizes).
- Per cupcake: ~320 calories
- Fat: 15g (5g saturated)
- Carbohydrates: 45g (2g fiber, 25g sugar)
- Protein: 4g
- Sodium: 180mg
A few notes from my kitchen experiments: Using full-fat dairy and real butter (never margarine!) bumps up the richness but also the fat content. Opting for low-sugar cherry filling can shave off about 20 calories per cupcake. And those chocolate shavings? Surprisingly minimal impact – so pile ’em on guilt-free!
Remember, these are treats meant to be savored slowly with good coffee and better company. I always say one perfectly made cupcake beats three “diet” versions any day!
FAQs About Bakery Copycat Black Forest Cupcakes
Over the years, I’ve gotten so many questions about these cupcakes – and I love helping fellow bakers avoid the mistakes I’ve made! Here are the most common head-scratchers with my hard-won answers:
Can I use frozen cherries instead of pie filling?
Absolutely! Thaw 2 cups frozen cherries, then simmer with 1/4 cup sugar and 1 tablespoon cornstarch until thickened. Let it cool completely before filling the cupcakes. Bonus? You can adjust the sweetness to your taste. Just don’t skip the cornstarch or you’ll end up with a runny mess.
How do I stabilize whipped cream so it lasts longer?
My secret weapon? A teaspoon of instant vanilla pudding mix per cup of cream – it stiffens beautifully without changing flavor. For parties, I’ll sometimes add 1/4 teaspoon cream of tartar while whipping. Both methods keep the cream looking perfect for hours without that weird gelatin mouthfeel.
Why did my cupcakes sink in the middle?
Oh honey, we’ve all been there! Usually it’s one of three things: overmixing the batter (develops too much gluten), opening the oven door too early (they’re like soufflés – no peeking!), or old baking soda. Next time, mix just until combined and set a timer so you’re not tempted to check them too soon.
Can I make these gluten-free?
You bet! Swap the all-purpose flour for a 1:1 gluten-free blend (I like King Arthur’s). The texture will be slightly more delicate, so handle them gently when filling. And don’t forget to check that your baking soda and cocoa powder are GF too – some brands process them in facilities with wheat.
What’s the best way to transport these to a party?
After one disastrous car ride with cream-smeared cupcakes, I learned this trick: chill them until the whipped cream is firm, then arrange in a cupcake carrier with parchment squares between each one. Bring the chocolate shavings in a baggie to sprinkle on right before serving. Pro tip? Put the carrier on your car floor, not the seat – less sliding around!
Bakery Copycat Black Forest Cupcakes Recipe: 1 Bite & You’re Hooked
- Total Time: 40 minutes
- Yield: 12 cupcakes 1x
- Diet: Vegetarian
Description
Delicious bakery-style black forest cupcakes with layers of chocolate cake, cherry filling, and whipped cream.
Ingredients
- 1 1/2 cups all-purpose flour
- 1/3 cup cocoa powder
- 1 tsp baking soda
- 1/2 tsp salt
- 1 cup sugar
- 1/2 cup vegetable oil
- 1 egg
- 1 tsp vanilla extract
- 1 cup buttermilk
- 1 can cherry pie filling
- 1 cup heavy cream
- 2 tbsp powdered sugar
- Chocolate shavings for garnish
Instructions
- Preheat oven to 350°F and line a muffin tin with cupcake liners.
- Whisk flour, cocoa powder, baking soda, and salt in a bowl.
- In another bowl, mix sugar, oil, egg, and vanilla until smooth.
- Alternate adding dry ingredients and buttermilk to the wet mixture.
- Fill cupcake liners 2/3 full and bake for 18-20 minutes.
- Let cupcakes cool, then scoop a small hole in the center of each.
- Fill holes with cherry pie filling.
- Whip heavy cream and powdered sugar until stiff peaks form.
- Pipe whipped cream onto cupcakes and garnish with chocolate shavings.
Notes
- Use high-quality cocoa powder for best flavor.
- Chill the mixing bowl before whipping cream for better results.
- Store cupcakes in the refrigerator due to the whipped cream topping.
- Prep Time: 20 minutes
- Cook Time: 20 minutes
- Category: Dessert
- Method: Baking
- Cuisine: German
Nutrition
- Serving Size: 1 cupcake
- Calories: 320
- Sugar: 25g
- Sodium: 180mg
- Fat: 15g
- Saturated Fat: 5g
- Unsaturated Fat: 8g
- Trans Fat: 0g
- Carbohydrates: 45g
- Fiber: 2g
- Protein: 4g
- Cholesterol: 35mg


