
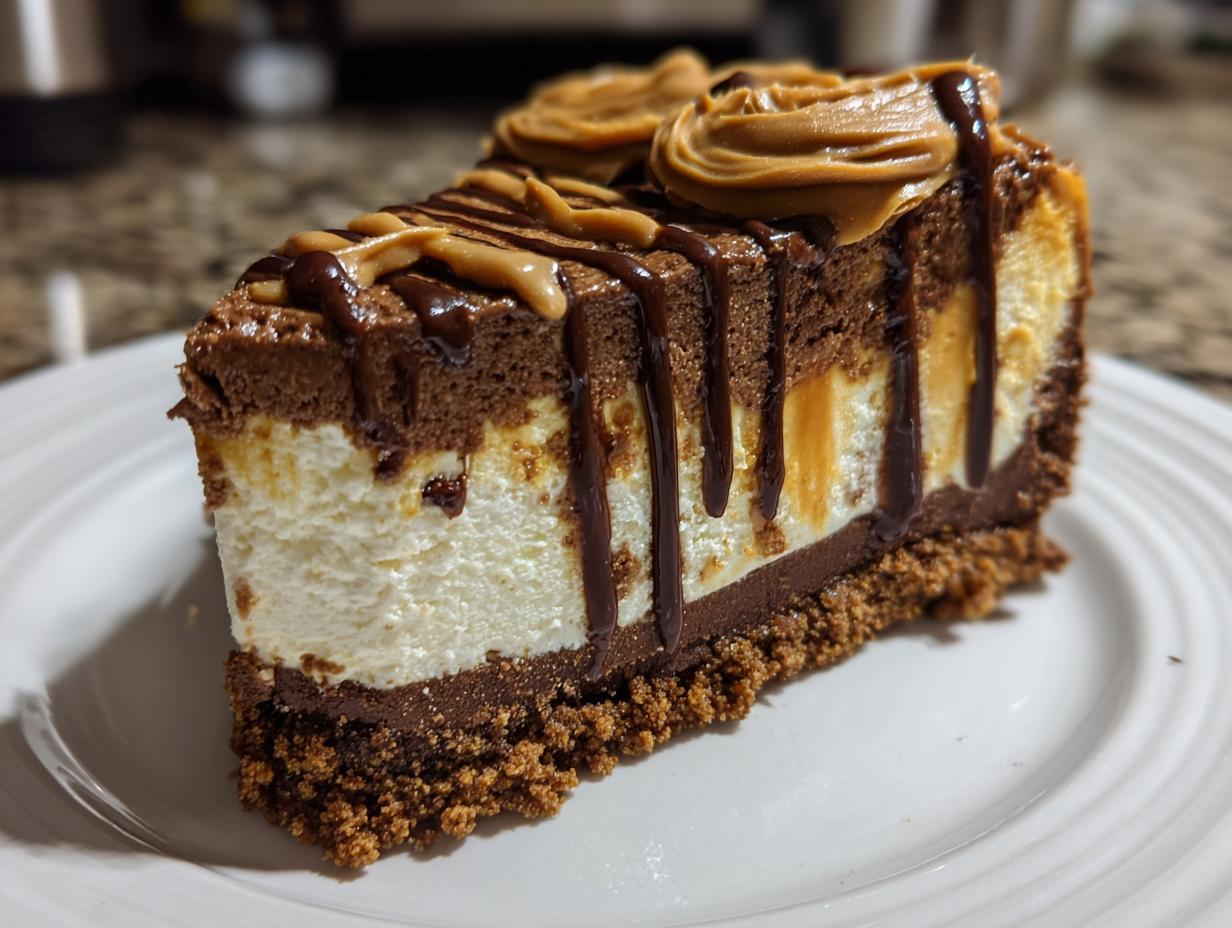
Oh my goodness, have you tried that viral no-bake Biscoff chocolate cheesecake that’s been blowing up everywhere? I swear, the first time I made this beauty, my family nearly licked the plate clean. It’s become my go-to dessert when I need something impressive but don’t want to turn on the oven (because who has time for that?). I’ve been making no-bake cheesecakes for years, but this Biscoff version? Absolute game-changer. The combination of that spiced cookie crust with layers of creamy filling and rich chocolate drizzle – it’s like dessert heaven in every bite. And the best part? You don’t even need to bake it!
Why You’ll Love This Viral No-Bake Biscoff Chocolate Cheesecake
Listen, this cheesecake isn’t just delicious—it’s downright magical. Here’s why:
- No oven required – Perfect for hot summer days or when you just can’t be bothered to bake
- That Biscoff flavor – The caramelized, spiced cookie taste pairs insanely well with rich chocolate
- Creamy dreamy texture – Silky smooth filling that melts in your mouth (but holds its shape!)
- Crowd-pleaser guaranteed – I’ve never met anyone who didn’t go back for seconds
- Foolproof to make – Even if you’re not a confident baker, you can nail this recipe
- Looks fancy – The layered chocolate drizzle makes it look like you spent hours
Trust me, once you try this, you’ll understand why it went viral!
Ingredients for Viral No-Bake Biscoff Chocolate Cheesecake
Okay, let’s gather our goodies! Here’s exactly what you’ll need to make this dreamy dessert:
- 200g Biscoff biscuits – crushed into fine crumbs (save a few whole ones for garnish if you’re feeling fancy)
- 100g unsalted butter – melted until just liquid (I microwave mine in 20-second bursts to avoid explosions)
- 300g full-fat cream cheese – softened at room temperature (this is KEY for smooth mixing)
- 100g powdered sugar – sifted if you want extra smooth filling (I sometimes cheat and don’t sift – shh!)
- 200ml heavy whipping cream – cold from the fridge (trust me, cold cream whips up fluffier)
- 1 tsp pure vanilla extract – the good stuff makes all the difference
- 100g dark chocolate – melted and slightly cooled (I use 70% but milk chocolate works too)
- 3 tbsp Biscoff spread – for that glorious swirly topping (plus extra for sneaky spoonfuls while cooking)
Pro tip: Measure everything before you start – it makes the whole process so much smoother. And yes, you definitely need all that Biscoff goodness!
Equipment You’ll Need
Grab these basics from your kitchen – you probably have most already!
- 20cm springform tin – The sides pop off so your cheesecake slides out perfectly
- Mixing bowls – One big one for the filling, another for crushing biscuits
- Electric mixer – A hand mixer works great for whipping cream and blending filling
- Spatula – For scraping every last bit of that delicious filling into the tin
- Measuring cups/spoons – Precision matters with no-bake desserts
That’s it! No fancy gadgets needed for this viral wonder.
How to Make Viral No-Bake Biscoff Chocolate Cheesecake
Alright, let’s get to the fun part! This cheesecake comes together so easily—you’ll be amazed at how professional it looks with minimal effort. Just follow these simple steps, and you’ll have a showstopper dessert ready in no time.
Preparing the Biscuit Base
First things first—let’s make that irresistible Biscoff crust. Grab your biscuits and crush them into fine crumbs (I use a rolling pin or food processor if I’m feeling lazy). Mix the crumbs with melted butter until they look like wet sand. Now, press this mixture firmly into the bottom of your springform tin—I mean really press it down with the back of a spoon or your fingers. This is your foundation, so make it solid! Pop it in the fridge for 15 minutes to set while you work on the filling.
Making the Cheesecake Filling
Time for the creamy part! In a large bowl, beat your softened cream cheese and powdered sugar until smooth—no lumps allowed! Then, in another bowl, whip the cold cream until soft peaks form. Gently fold the whipped cream into the cream cheese mixture, along with the vanilla extract. Be careful not to overmix—you want to keep all that airy fluffiness intact. The filling should be thick but silky, like a cloud of deliciousness.
Layering and Setting
Now for the magic! Spread half of your filling over the chilled biscuit base. Next, drizzle that melted chocolate over the top—I like to zigzag it for a pretty effect. Carefully spoon the rest of the filling on top, smoothing it out with a spatula. Now, the hardest part: patience! Chill your cheesecake for at least 4 hours, but overnight is even better. When you’re ready to serve, warm the Biscoff spread slightly and drizzle it over the top. Oh, and don’t forget to snap a pic before everyone digs in—it’s too pretty not to share!
Tips for the Perfect Viral No-Bake Biscoff Chocolate Cheesecake
Want to make sure your cheesecake turns out absolutely perfect? Here are my tried-and-true tips:
- Room temp cream cheese is key – Cold cream cheese leads to lumpy filling. Let it soften for at least 30 minutes before mixing.
- Don’t overmix the filling – Once you fold in the whipped cream, stop mixing! Overworking it makes the texture dense instead of light and fluffy.
- Chill overnight if you can – I know it’s hard to wait, but that extra time makes the flavors meld beautifully.
- Warm your Biscoff spread – Just 10 seconds in the microwave makes it drizzle perfectly over the top.
- Use a hot knife for clean slices – Dip your knife in hot water and wipe it dry between cuts for picture-perfect pieces.
Trust me, these little tricks make all the difference between good and absolutely amazing!
Variations and Substitutions
Oh, the possibilities! Here’s how you can play with this recipe when you’re feeling creative (or just need to use what’s in your pantry):
- Chocolate swap – Use white chocolate or milk chocolate instead of dark for a sweeter twist
- Biscuit backup – No Biscoff? Digestives or graham crackers work great for the base
- Flavor boost – Add a pinch of cinnamon or espresso powder to the filling for extra depth
- Nutty variation – Stir chopped toasted hazelnuts into the biscuit base for crunch
The beauty? It’s still foolproof no matter what tweaks you make!
Serving and Storing Viral No-Bake Biscoff Chocolate Cheesecake
Oh, serving this beauty is half the fun! I always take it out of the fridge about 10 minutes before slicing—it makes the texture just perfect. For extra wow factor, drizzle a little more warmed Biscoff spread over each slice right before serving. Leftovers? (As if!) Just cover tightly and refrigerate for up to 3 days. Fair warning—it never lasts that long in my house! Avoid freezing though—the texture goes a bit grainy. Trust me, you’ll want to enjoy every creamy bite fresh!
Nutritional Information
Now, let’s be real – we’re not eating cheesecake for its health benefits! But if you’re curious (or just keeping track), here’s the nutritional breakdown per slice. Remember, these are estimates and can vary based on your exact ingredients and how generous you are with that Biscoff drizzle!
- Calories: 380 (worth every single one!)
- Fat: 25g (14g saturated – that’s the good creamy stuff)
- Carbohydrates: 32g
- Sugar: 25g (it’s dessert, after all!)
- Protein: 4g (surprise protein boost!)
- Fiber: 1g (from those Biscoff biscuits)
My philosophy? Life’s too short to count calories when there’s Biscoff involved. Enjoy every bite guilt-free – you can always go for a walk tomorrow!
Frequently Asked Questions
I get asked about this cheesecake all the time – here are the answers to the questions that pop up most often!
- “Can I use peanut butter instead of Biscoff spread?” You can, but it’ll taste completely different! The caramelized spice of Biscoff is what makes this special. If you must substitute, try speculoos cookie butter for a similar vibe.
- “How long until it sets properly?” Minimum 4 hours, but overnight is magic. I know waiting is hard (I peek at mine every hour!), but patience gives you that perfect sliceable texture.
- “My filling seems runny – did I mess up?” Don’t panic! This usually means either the cream wasn’t whipped enough or it needs more chilling time. Pop it back in the fridge – it’ll firm up.
- “Can I make this ahead for a party?” Absolutely! It actually tastes better on day two. Just add the final Biscoff drizzle right before serving so it stays pretty.
Still got questions? Drop them in the comments – I’m happy to help troubleshoot!
Final Thoughts
There you have it – your ticket to dessert stardom! This no-bake Biscoff chocolate cheesecake is seriously life-changing. I can’t wait for you to try it and see those happy faces when you serve it. Don’t forget to snap a pic and tag me – I love seeing your creations! Now go make some cheesecake magic!
Print
Viral No-Bake Biscoff Chocolate Cheesecake in 20 Minutes
- Total Time: 4 hours 20 minutes
- Yield: 8 servings 1x
- Diet: Vegetarian
Description
A quick and easy no-bake cheesecake with Biscoff and chocolate flavors. Perfect for any occasion.
Ingredients
- 200g Biscoff biscuits
- 100g unsalted butter, melted
- 300g cream cheese
- 100g powdered sugar
- 200g whipped cream
- 1 tsp vanilla extract
- 100g melted dark chocolate
- Biscoff spread for topping
Instructions
- Crush Biscoff biscuits into fine crumbs.
- Mix biscuit crumbs with melted butter and press into a cake tin to form the base. Chill for 15 minutes.
- Beat cream cheese and powdered sugar until smooth.
- Fold in whipped cream and vanilla extract.
- Spread half the mixture onto the biscuit base.
- Drizzle melted chocolate over the first layer, then add the remaining cream mixture.
- Chill for at least 4 hours or until set.
- Top with Biscoff spread before serving.
Notes
- Use a springform tin for easy removal.
- Chill the cheesecake overnight for best results.
- Adjust sweetness by reducing powdered sugar if desired.
- Prep Time: 20 minutes
- Cook Time: 0 minutes
- Category: Dessert
- Method: No-Bake
- Cuisine: International
Nutrition
- Serving Size: 1 slice
- Calories: 380
- Sugar: 25g
- Sodium: 120mg
- Fat: 25g
- Saturated Fat: 14g
- Unsaturated Fat: 8g
- Trans Fat: 0g
- Carbohydrates: 32g
- Fiber: 1g
- Protein: 4g
- Cholesterol: 50mg


