

Oh, the smell of Nostalgic Chocolate Whoopie Pies baking in the oven—it takes me right back to my grandma’s kitchen, where flour dusted the countertops and laughter filled the air. These weren’t just desserts; they were little pockets of joy, soft as a cloud with a creamy filling that made every bite feel like a hug. I still remember sneaking an extra one when she wasn’t looking, the chocolatey crumbs sticking to my fingers.
What makes these whoopie pies so special? That perfect balance of rich cocoa and marshmallow fluff filling—it’s like biting into childhood itself. Whether it was a school bake sale or a lazy Sunday afternoon, these treats were always the star. And now, after years of tweaking and tasting, I’ve finally nailed the recipe that brings back those warm, fuzzy memories. Trust me, once you try these, you’ll understand why they’ve been a family favorite for generations.
Why You’ll Love These Nostalgic Chocolate Whoopie Pies
Let me tell you why these whoopie pies will become your new go-to treat:
- Easy as pie (whoopie pie, that is!) – No fancy techniques here, just simple mixing and baking that even beginners can nail
- That dreamy texture – Soft, cakey cookies with a cloud-like marshmallow filling that melts in your mouth
- Rich chocolate flavor – The perfect balance of cocoa that’s not too sweet, not too bitter – just right
- Instant crowd-pleaser – They disappear fast at parties (I always make a double batch!)
- Pure nostalgia in every bite – One taste and you’ll be transported back to simpler times
Seriously, what’s not to love? These are happiness baked into portable little sandwiches.
Ingredients for Nostalgic Chocolate Whoopie Pies
Here’s everything you’ll need to make these dreamy treats – and yes, I’m picky about certain ingredients because they really do make all the difference!
For the chocolate cookies:
- 2 cups all-purpose flour – spooned and leveled, not packed
- 1/2 cup cocoa powder – I prefer Dutch-processed for richer flavor
- 1 tsp baking soda – make sure it’s fresh!
- 1/2 tsp salt – just regular table salt works fine
- 1/2 cup unsalted butter, softened – leave it out for 30 minutes before baking
- 1 cup granulated sugar – plain white sugar does the trick
- 1 large egg – room temperature blends better
- 1 tsp vanilla extract – pure, not imitation
- 1 cup buttermilk – see my substitution tip below if you’re out
For the fluffy filling:
- 1/2 cup marshmallow fluff – the secret weapon!
- 1/4 cup shortening – keeps the filling stable
- 1 cup powdered sugar – packed firmly into the measuring cup
- 1 tsp vanilla extract – same good quality as above
Buttermilk hack: No buttermilk? No problem! Mix 1 cup milk with 1 tablespoon lemon juice or white vinegar and let it sit for 5 minutes. It’ll curdle slightly and work just as well in the recipe.
Equipment You’ll Need
You won’t need any fancy gadgets for these whoopie pies – just the basics from your kitchen:
- 2 mixing bowls – one for dry ingredients, one for wet
- Hand mixer or stand mixer – though a strong arm and whisk will work in a pinch!
- Baking sheets – I always use two for efficiency
- Parchment paper – lifesaver for easy cleanup
- Measuring cups and spoons – precision matters here
- Spatula – for scraping every last bit of batter
- Cooling rack – essential for perfect texture
That’s it! Now let’s get baking.
How to Make Nostalgic Chocolate Whoopie Pies
Okay, let’s dive into the fun part – making these little bites of heaven! Don’t worry if you’re not a pro baker – my grandma taught me this recipe when I was barely tall enough to reach the counter, so trust me, anyone can do it.
1. Preheat and Prep
First things first – crank that oven to 375°F (190°C). While it’s heating up, line your baking sheets with parchment paper. (This is non-negotiable – it prevents sticking and makes cleanup a breeze!)
2. Mix the Dry Ingredients
Grab a medium bowl and whisk together:
- 2 cups all-purpose flour
- 1/2 cup cocoa powder
- 1 tsp baking soda
- 1/2 tsp salt
Whisk until you don’t see any lumps – this ensures even distribution of the leavening agents so your whoopie pies rise perfectly.
3. Cream the Butter and Sugar
In a large bowl, beat the softened butter and granulated sugar together for about 2 minutes until light and fluffy. This step is crucial – it creates air pockets that make the cookies tender. Then beat in:
- 1 large egg
- 1 tsp vanilla extract
Mix until fully incorporated – the batter should look smooth and slightly glossy.
4. Alternate Wet and Dry Ingredients
Here’s grandma’s secret technique:
- Add 1/3 of the dry ingredients to the butter mixture, mixing just until combined
- Pour in 1/2 cup buttermilk, mixing gently
- Repeat with another 1/3 dry ingredients and remaining buttermilk
- Finish with the last of the dry ingredients
Don’t overmix! Some small lumps are okay – they’ll disappear during baking.
5. Scoop and Bake
Using a tablespoon or small cookie scoop, drop mounds of batter onto your prepared sheets, spacing them about 2 inches apart. They’ll spread a bit as they bake.
Slide them into the oven for 10-12 minutes. You’ll know they’re done when the tops spring back lightly when touched – no need for a toothpick test here!
6. Cool Completely
Transfer the cookies to a cooling rack immediately. This stops the baking process and prevents soggy bottoms. Let them cool completely before filling – about 30 minutes. (I know it’s hard to wait!)
7. Make the Fluffy Filling
While the cookies cool, beat together:
- 1/2 cup marshmallow fluff
- 1/4 cup shortening
- 1 cup powdered sugar
- 1 tsp vanilla extract
Whip it until smooth and fluffy – about 2 minutes. The filling should hold its shape when you lift the beaters.
8. Assemble Your Whoopie Pies
Spread a generous dollop of filling on the flat side of half the cookies, then gently press another cookie on top. Give it a slight twist to help them stick together.
Voilà! You’ve just created pure nostalgia in cookie form.
Tips for Perfect Nostalgic Chocolate Whoopie Pies
Alright, let me share my hard-earned secrets for whoopie pie perfection! After years of trial and error (and a few cookie casualties), here’s what I’ve learned:
Get the spacing just right
Those little mounds of batter grow like magic in the oven! I always leave at least 2 inches between each – any closer and you’ll end up with one giant whoopie pie blob (tasty, but not what we’re going for). If you’re unsure, bake a test cookie first to see how much it spreads.
The toothpick trick (but not how you think)
Most recipes tell you to use a toothpick to check doneness, but with whoopie pies, I look for three signs:
- The tops spring back when lightly pressed
- The edges look set but not crispy
- A toothpick comes out with moist crumbs (not wet batter)
Pull them out when they’re just barely done – they’ll continue cooking slightly on the hot pan.
Buttermilk is your texture secret weapon
Want even softer cookies? Add 1-2 extra tablespoons of buttermilk to the batter. The acidity tenderizes the gluten, giving you that dreamy cake-like texture. But don’t go overboard or your cookies might spread too thin!
The cooling patience game
I know it’s tempting to slap that filling on warm cookies, but wait until they’re completely cool! Otherwise, your fluffy filling will melt into a sad, runny mess. I usually distract myself by cleaning up (or sneaking a broken cookie – baker’s privilege!).
Follow these tips, and you’ll have whoopie pies that would make my grandma proud. Now go forth and bake with confidence!
Variations for Nostalgic Chocolate Whoopie Pies
Once you’ve mastered the classic, try these fun twists to mix things up:
- Peppermint delight: Add 1/4 tsp peppermint extract to the filling for a cool holiday twist (perfect with hot cocoa!)
- Birthday party version: Roll the filled edges in rainbow sprinkles – instant celebration!
- Mocha magic: Stir 1 tbsp instant espresso powder into the dry ingredients for grown-up coffee flavor
See? Endless ways to play with this nostalgic favorite!
Storing and Serving Nostalgic Chocolate Whoopie Pies
Now that you’ve made these beauties, let’s talk about keeping them fresh and serving them up right! Here’s everything I’ve learned about handling these delicate treats:
How to store them properly
These whoopie pies stay deliciously fresh for up to 3 days when stored in an airtight container at room temperature. I like to layer them between sheets of parchment paper so they don’t stick together. Whatever you do, don’t refrigerate them – the cold turns the filling weirdly stiff and dries out the cookies.
Freezing for later (yes, it works!)
Got extras? (Unlikely, but just in case!) You can freeze unfilled cookies for up to 2 months. Just thaw at room temperature and fill when ready to serve. The filling itself doesn’t freeze well, so I always make that fresh.
The perfect way to serve
These nostalgic treats deserve the right pairing! My family always serves them with:
- Ice-cold milk – the classic combo that never fails
- Hot coffee – the rich chocolate and creamy filling complement bitter brew perfectly
- On their own – because sometimes you just need to sneak one straight from the container!
Pro tip: If you’re serving them at a party, arrange them on a pretty plate and watch them disappear faster than you can say “whoopie!”
Nutritional Information
Okay, let’s be real – we’re not eating whoopie pies for their health benefits! But since you asked (or maybe your curious conscience did), here’s the nutritional breakdown per pie. Remember, these are estimates – actual values can vary based on your specific ingredients.
Per serving (1 whoopie pie):
- Calories: 280
- Fat: 12g (6g saturated, 4g unsaturated)
- Carbohydrates: 40g
- Sugar: 25g
- Protein: 3g
- Sodium: 180mg
Now, before you panic about the numbers, remember my grandma’s wise words: “Everything in moderation – including moderation!” These are treats meant to be enjoyed, not counted. But if you’re watching your intake, you can always share one with a friend (or not – I won’t judge!).
The marshmallow fluff and powdered sugar in the filling contribute most of the sugar content, while the butter and shortening give that rich mouthfeel we all love. The cocoa powder actually provides a bit of fiber and antioxidants – see? There’s always a silver lining!
Common Questions About Nostalgic Chocolate Whoopie Pies
Over the years, I’ve gotten all sorts of questions about these beloved treats – and I’m happy to share the answers I’ve discovered through plenty of kitchen experiments (and happy accidents!). Here are the most common ones:
Can I freeze whoopie pies?
Absolutely! But here’s my pro tip: freeze the cookies unfilled. The marshmallow filling doesn’t hold up well to freezing – it gets grainy when thawed. Just stack the cooled cookies between parchment paper in an airtight container, and they’ll keep beautifully for up to 2 months. When you’re ready to serve, let them thaw at room temperature for about an hour, then fill them fresh.
What if I don’t have buttermilk?
No worries – I’ve been there! Plain yogurt (regular or Greek) makes a great substitute. Just mix 1 cup yogurt with 1 tablespoon lemon juice and let it sit for 5 minutes. The acidity mimics buttermilk perfectly. Sour cream thinned with a bit of milk works too in a pinch. The key is that tangy element to react with the baking soda.
Why do my cookies come out flat?
Ah, the flat whoopie pie dilemma! Nine times out of ten, it’s because of overmixed batter. When you work the flour too much, you develop gluten that makes cookies spread. My grandma taught me to mix just until the ingredients combine – some small lumps are okay! Also, make sure your baking soda is fresh (test it with vinegar – it should bubble) and your oven temperature is accurate (an oven thermometer is a game-changer).
Remember, baking is part science, part love – don’t stress if your first batch isn’t perfect. Even my “failures” still taste amazing with a glass of milk!
Print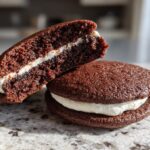
Irresistible 2-Ingredient Nostalgic Chocolate Whoopie Pies
- Total Time: 32 minutes
- Yield: 12 whoopie pies 1x
- Diet: Vegetarian
Description
Classic chocolate whoopie pies with a creamy filling, perfect for a nostalgic treat.
Ingredients
- 2 cups all-purpose flour
- 1/2 cup cocoa powder
- 1 tsp baking soda
- 1/2 tsp salt
- 1/2 cup unsalted butter, softened
- 1 cup granulated sugar
- 1 large egg
- 1 tsp vanilla extract
- 1 cup buttermilk
- 1/2 cup marshmallow fluff
- 1/4 cup shortening
- 1 cup powdered sugar
- 1 tsp vanilla extract
Instructions
- Preheat oven to 375°F (190°C). Line baking sheets with parchment paper.
- Whisk flour, cocoa powder, baking soda, and salt in a bowl.
- Cream butter and sugar until light and fluffy. Beat in egg and vanilla.
- Alternate adding dry ingredients and buttermilk, mixing until smooth.
- Drop tablespoonfuls of batter onto baking sheets, spacing 2 inches apart.
- Bake for 10-12 minutes. Cool completely on a wire rack.
- Beat marshmallow fluff, shortening, powdered sugar, and vanilla until smooth.
- Spread filling on half the cookies and top with remaining cookies.
Notes
- Store in an airtight container for up to 3 days.
- For softer cookies, add 1-2 tbsp extra buttermilk.
- Prep Time: 20 minutes
- Cook Time: 12 minutes
- Category: Dessert
- Method: Baking
- Cuisine: American
Nutrition
- Serving Size: 1 whoopie pie
- Calories: 280
- Sugar: 25g
- Sodium: 180mg
- Fat: 12g
- Saturated Fat: 6g
- Unsaturated Fat: 4g
- Trans Fat: 0g
- Carbohydrates: 40g
- Fiber: 2g
- Protein: 3g
- Cholesterol: 35mg


